Showing posts with label cake. Show all posts

Friday, March 26, 2010

Another food contest entry! Tea cakes for KO Rasoi!

I'd like to say it seems to be the season for food blog contests right now, but I think it's more of a matter of contests that have piqued my interest enough to go thru all the effort I inflict on myself in making my entries.  The creative pondering, flustered experimenting and the occasional mini-inferno I run into while submitting posts means it's gotta be good for me to do it.  When I saw Sanjana's contest over at KO Rasoi, I knew it was time to pull out the fire extinguisher again and get baking.

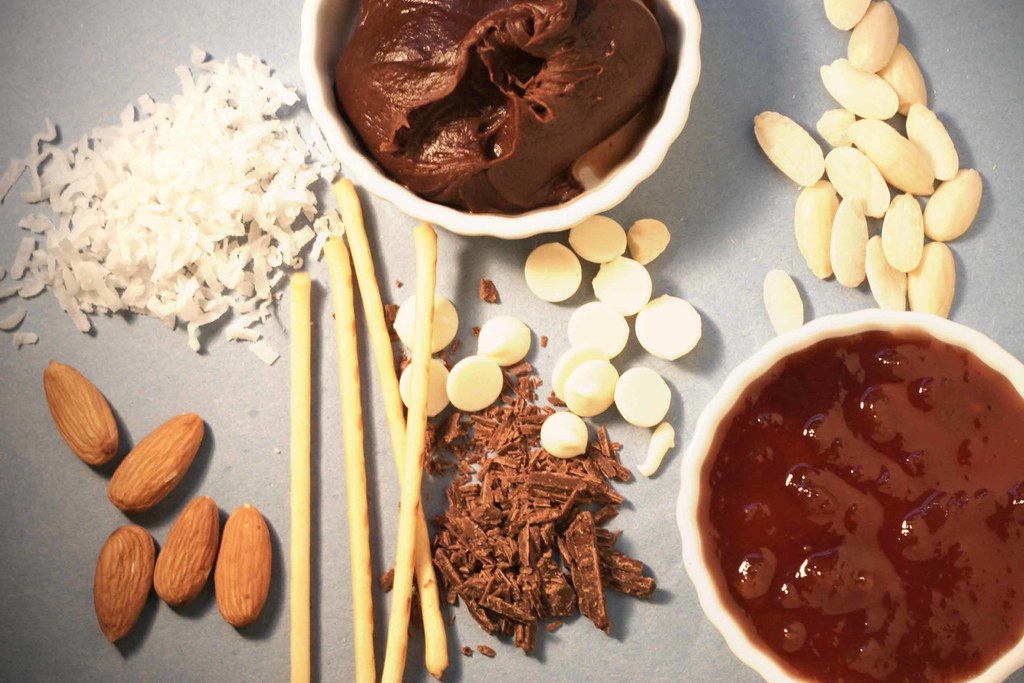
Sanjana's contest asked that you create a dish inspired by a super adorable charm bracelet...

 
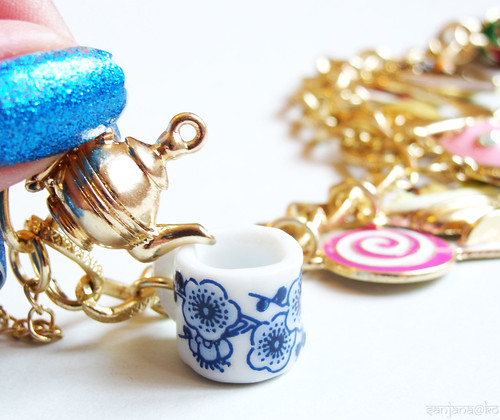
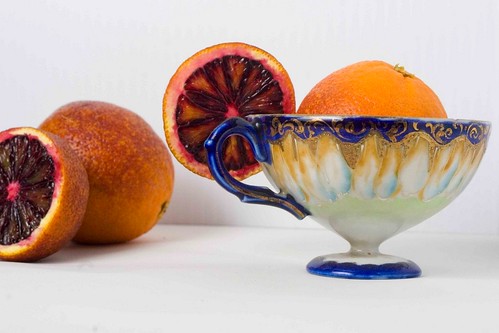
The bracelet is almost as adorable as the cool blue sparkly nail polish you can see she's wearing in the picture... see it now?  Other than the polish, the thing that caught my eye was the little white and blue delft style china cup charm.  Seeing as it's a roughly "tea" themed bracelet (though I don't remember the last time I had a margarita at tea, sadly), I decided I'd make something I've always wanted to make - petit fours.


What I didn't realize is that "petit four" is actually a French phrase meaning "insanely difficult" or "frustrating to the point of drinking a 3 glasses of wine rapidly, on an empty stomach because these 'petit fours' refuse to provide you with something suitable to feed yourself with."  Or something roughly like that.


You see, I wanted these to be not just any petit fours.  Oh, no, that's just too dull (wise) for me.  I wanted to make the sort of cakes that you could write on with edible marker to create patterns - in this case patterns that match your tea service.  This meant coating them with something that dried hard enough to accomplish this.  Typical petit four icing is a little too fragile for this, I figured.  I first tried rolling on some of my trusty recipe for marshmallow fondant, but I didn't like the way it draped.  Next my mind turned to royal icing.  Royal icing was something I vaguely remembered using on sugar cookies my mother made when I was little, but I always remembered liking them better without it.  Despite that and the fact most recipes I read included warnings like "Use immediately or it will harden indefinitely" and "Good as a glue, but not pleasant to flavor with" I was not to be deterred.


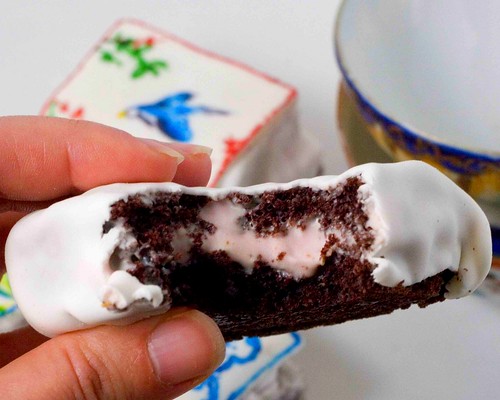
An hour later I had coated a beautiful set of little chocolate cakes in a gloppy, uneven mess of what amounted to Elmer's glue... and it tasted about the same.  I honestly don't know if it was my recipes (I tried 2), the cook or a combination that did me in, but in the end I tossed the whole collection of useless lumps into the trash.  Enter wine.


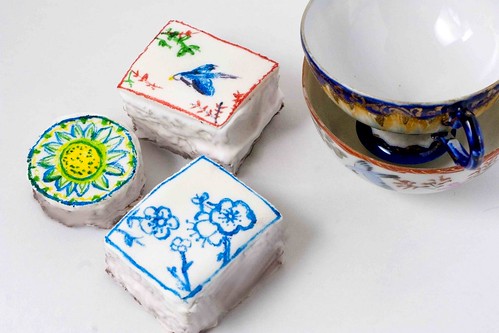
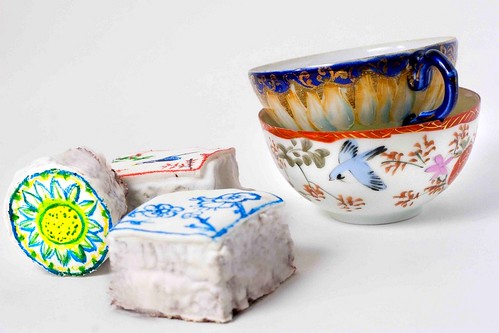
The next day I did some more research and turns out it's not a great idea to coat entire cakes with royal icing.  I also realized I needed a denser cake - like a gĂ©noise or sponge.  Who knew?  Lots of people do, as my reading was leading me to understand.  Obviously I'm still new at this cake thing.  In the end the tea cakes shown in the pictures have a combination of petit four icing with a top piece of fondant.  Which works, but I think it's a bit too labor-intensive for such little cakes, don't you?  In fact, when Jason saw these and then looked at the sample I kept of the strictly fondant version, he said he liked the fondant version better.  It was my drive for perfectly smooth shapes that made me wish for the perfect icing.  The more I thought about it, the more I realized the fondant ones didn't look too shabby, I liked their little pillow-y edges... and they certainly were less conducive to reducing me to near tears.  Less tears = win in my book any day. 

How to Make: Blood Orange and Chocolate Petit Fours


Since I take the cake recipe directly from the Joy of Baking site, I'm not going to reproduce it here.  It's adapted from the Cake Queen: Rose Levy , so you know it's good.  The link can be found below...

Recipe for Chocolate Sponge Cake on Joy of Baking

Once you've made your cake and allowed it to cool, cut it into desired shapes using cutters or a serrated knife.  You'll want and even number of every shape since you'll fill w/frosting and stacking in doubles...

To make the Blood Orange Frosting...

 2 cups confectioners sugar
1/2 cup unsalted butter (softened)
1/2 teaspoon vanilla extract
Juice and zest of 1 large blood orange
Orange food coloring (if desired)

With a hand or electric mixer, cream the butter until smooth.  Add vanilla and the zest and blend.  Gradually beat in sugar.  Add the blood orange juice and whip on high until fluffy.  You may add a drop of orange food coloring if you like.

For the icing...

Approx 1 cup by volume of marshmallow fondant
Various edible marker colors

To put it all together...

Roll out your fondant to an 1/8 inch thickness and cut into shapes that allow you to cover your stacked cake shapes.


Spread a layer of blood orange frosting between two layers of sponge cake.  Frost the outside with a thin crumb coating of frosting to allow the fondant to adhere evenly.

Drape your cakes with fondant pieces and smooth tops

Using your food-coloring pens, draw patterns based on your tea cups on the tops of your cakes.  Done!

Saturday, January 23, 2010

Pursuits in baking - Easy Blueberry Lemon Bundt


So, I've decided to start baking more.  I've hesitant to bake much for years, limiting myself to just flipping thru baking and decorating books and vicariously making alterations and imagining the perfect, awe-inspring results.  The reality, I felt, would be much different.  Exploding muffin tins, caved cheesecakes and gravity-oppressed souffles haunt my dreams.


I'm not exactly sure why I have this primal fear of desserts.  Perhaps starting up now will reveal a repressed memory of a bananas foster gone wrong setting my pigtails a-flame as a child?  Or maybe in another life I was flattened by a rogue 50 lbs bag of flour that leapt from a high shelf at the General Store?  More likely it's a simple fear of failure... and the mess this will turn my kitchen into on a regular basis.

All of that being said, I'm excited to branch out into the baking world... and to be sharing it with all of you.  Hopefully they're be lots of fun to be had, and probably a disaster or two to laugh about.  I mean, seriously, look what I do when I just taking PICTURES of baked things.

I thought I'd start out with some baby steps here and explore a couple of recipes that almost require a cake mix.  I say "require" because I've learned the hard way that adding things willy-nilly to pre-set cake recipes can get you into lots of trouble.  Boxed cake mixes, besides being fool-proof, contain emulsifiers that allow you throw in additions without making much, if any, changes to the mix recipe.


So here is my first project.  Be sure to check out the wonderful Carol Egbert's site for another project I guest posted on rainbow cupcakes using all-natural color - it should be up soon!


Recipe: Blueberry Lemon Burst Bundt Cake

What you'll need...
One box vanilla or white cake mix (you can also use lemon if you really want lemony cake!)
PLUS
Whatever ingredients the cake mix calls for
1 cup of plain yogurt (you can also use blueberry yogurt to really up the blueberry flavor!)
1 cup frozen or fresh blueberries
1/2 cup water
The zest and juice of one lemon
1 teaspoon of turmeric (optional, for bright yellow color - don't worry, your cake won't taste like turmeric!)

Special equipment: 12 cup bundt pan, small sauce pan, hand blender or food processor

What to do with it all...

Preheat oven to temperature according to boxed mix for a bundt pan
Liberally grease your bundt pan 
Add blueberries and water to a small saucepan to simmer for 5 mins, or until thawed (if using frozen) then allow to cool
Mix all cake mix ingredients according to directions, folding in the cup of yogurt, lemon juice and zest and optional turmeric
Puree your blueberries using a hand blender or food processor/stand blender
Pour puree into your cake batter, but do not stir
Pour batter into your bundt pan and bake according to box instructions (your cake may take a little longer because of the additions)
Remove after baking and allow to cool before inverting and removing
Glaze with a simple syrup, honey or simply dust with powdered sugar!

Friday, January 15, 2010

Reinventing the Lamington cake: LAMBington cake "pops"... PART TWO!

Finally after much smoke and messy chocolate, the LAMBingtons photos & recipe is here!


Introducing...

Mortimer - the Traditionalist:


Clementine - The Sweet One:


Hubert - The... One That Got a Little Too Close to the Photo Lights and Got Melty:


As I mentioned yesterday, I had a little fire while taking pictures of these little guys, so I had to delay my REAL post until now.  So here they are, and if I must say so myself, they are rather adorable!  Thanks to Mr. P for creating a brilliant challenge over at Delicious Delicious Delicious He asked everyone to reinvent the lamington cake - the famous Australian dessert.  I thought, well, Australia has lots of lambs, right?  And "lamington" sure is close to LAMB...ington... soooooo....

I decided to model these little babies after the one and only Bakerella basic recipe for cake pops.  Those adorable, one-of-a-kind masterpieces that you don't even have to like cake to enjoy looking at for hours.  After making these, I searched her site and found that she even had some little sheep pops already!  They're very different from my guys, but I have a feeling if you put them all together in a room with some cocktails, they'd get along really well.  Obviously my sheep are not actually "pops" as they have legs... made out of plain Pocky sticks!  But the cake ball recipe is Bakerella's.  It was Jason's idea to add the chocolate eyes, by the way, and I'm so glad.  I really think they make these little guys.  He's brilliant!


Have you ever been the black sheep in the family?  This guy knows your pain!

So without further ado, here's my version of the lamington cake... I'm probably going to come back to this post to add more instructional photos and some better lit lamb photos once my new light arrives - yes, did I tell you?  I bought a new light to replace my burned light box.  It is, incidentally, the same one Bakerella uses *proud smile*.  Until then, I'll be feeling a little *ahem* SHEEPish about my sadly lit photos...

Recipe: The LAMBington Cake


What you need to get...

1 box of lemon or vanilla cake mix (plus ingredients on the back of the box per baking instructions)
1 can of vanilla frosting (16 oz)
1 package of white chocolate baking/melting chips (11 oz)
1 package of milk chocolate baking/melting chips (11 oz)
1 jar of good jam or preserves (I used quince)
1 bar of milk chocolate, shaved (you can use chocolate sprinkles instead)
1 cup shredded/dessicated coconut
1 box of plain Pocky - such as "Rost" variety OR small unsalted thin pretzel sticks
1 tablespoon Garam Masala (optional)
1 cup raw almonds
1 cup blanched/skinless almonds

Special equipment: 13 x 9 cake pan, large bowl, wax paper, a toothpick

What to do with it all...

  • For the cake oval bodies, bake your box cake according to directions for a 13 x 9 cake, adding the tablespoon of Garam Masala if desired  (also see Bakerella basic recipe)
  • Allow cake to cool and crumble into a large bowl, and add your vanilla frosting by large spoonfuls and combine by hand until you achieve a consistency sort of like meatloaf - easy to form ovals
  • Using a walnut-sized amount of cake mixture, form an oval shape, then cut the oval in half lengthwise and spread a small amount of jam in between - reassemble like a sandwich and reshape to an oval
  • Cut the ends off of Pocky sticks in one-inch pieces (you want the end pieces as they will form the feet), OR if you are using thin pretzel sticks, cut them in half
  • Melt your white and milk chocolate chips in small bowls according to package directions
  • Dip your cut ends of the Pocky or pretzle sticks into the chocolate (some in milk, some in white as you wish the final colors of the lambs to be), just a scant centimeter or so and then stick into your oval, repeat 3 x until you have "legs" (the chocolate acts as a glue of sorts) - make sure your legs are at even lengths so that when you set them down later, they'll stand properly
  • Place your lambs on their "backs" on a plate or small tray under a piece of wax paper and place into the freezer for at least 10 minutes
  • During this time you can arrange your "wooling" station by spreading shredded coconut on one plate, chocolate shavings or sprinkles on another, and rewarming your milk and white chocolate for dipping
  • Remove lambs from freezer and carefully dip one by one into the chocolate color to match the legs - make sure to cover the sides and front & tail
  • Quickly move your dipped lamb from the chocolate to the coconut or shavings and coat - chocolate dries quickly!
  • Now re-dip just one end slightly in chocolate to act as glue to attach your almond face - attach the almond with the pointed end so you have a rounded face
  • To make eyes you can either just dab on milk chocolate with the toothpick, or attach small bits of solid chocolate that you've rolled between your fingers just a little to soften and make round and attach that using the melted chocolate and the toothpick
That's it!  The LAMBington!

Wednesday, January 13, 2010

Reinventing the Lamington cake: LAMBington cake "pops"... PART I

Yeah... this is Part I for a reason that was not in my plan when I started putting this little guy together tonight.  But a lot of things weren't in my plan when I started this tonight...

First things first, though.  Mr. P of the venerable Delicious Delicious Delicious is holding a Lamington competition this month.  A very cool idea that I immediately had an entry in mind for.  While that entry is now, at this moment, sitting in my dining room, the rest of the plan (lots of brothers for my little entry and lots of pretty photos to accompany them) was not to be tonight.

The reason why?  I nearly set my house on fire with one of my photography lights.  Yep.  The photo says it all...


I'm a nine to fiver and I go to school, so often take my food photos at night using a little make-shift softbox light I build out of a cardboard box and and old t-shirt that I was very proud of... however, while taking pictures of my creation tonight, one of the lights tipped forward without my knowlege while I was arranging the shot and ignited the shirt part while I was fiddling with the Lamington.  NOTE: These lights are not normally that close to the lightbox, they were shifted during the "Omigod, fire!  What do I do?!  Stop Drop and Roll??!!  No... find blanket???  Maybe... Call hero boyfriend from other room to come douse the flames??!!  YES!!" part of the photo session.

Anyways, lesson learned here is don't be cheap, even if you're a poor student, and make your own lightbox thinking it will save you money.  Saving $$$ = Flamable Materials.   So, while we had a good laugh about it afterwards (and a few beers to calm the nerves),  needless to say I now no longer have a softbox light.  Therefore, I will have to take my proper pictures of this creation in daylight tomorrow... nice and early.

In the meantime, here is a shot in icky lighting of my entry for the very awesome contest at Mr. P's place...


There's also a chocolate/square version of him which will be completed tomorrow (he's resting in this photo, obviously, waiting to be coated in yummy frosting)...


Did I mention that the prize for winning this particular contest is a cookie cutter in the shape of a Welsh Dragon?  Yeah, pretty kick ace... of course, dragons breathe *gulp* ... fire...

So until tomorrow, when I will be revealing the recipe, REAL photos, etc for this challenge... I say goodnight to everyone.  I'm off to shower off the campfire smell!

LinkWithin

Related Posts with Thumbnails