Showing posts with label easy. Show all posts

Friday, March 12, 2010

On being away...

I've rewritten this post thirty times, nearly literally, and have realized the best way to say it, is just to say it.  I've been away from Peas Love Carrots because my father passed away, suddenly, early this month.  I rushed off to Enid, Oklahoma where he and some of my family live and have just recently returned from there.  I thought about not mentioning it on the blog, but well, it felt sort of wrong not to.
I don't intend this to be maudlin in any way.  The sadness I feel is mixed with the joy of memories of Dad.  Which is how I feel it has to be.  The years have been stripped away from thought and I am finding comfort in childhood recollection.  After hearing the news he was gone, several memories rushed immediately to mind that have not left it since.  One was of his large bristly mustache, which was an eternal source of amusement for me as a little girl.  The mustache had a personality all it's own and I would watch with curiosity as he groomed it every day with a little comb that reminded me of the one I used on my Barbie's hair.  It would tickle my cheek with every kiss goodnight.  It would twitch, Charlie Chaplin-style, whenever he knew I was watching him, just because he knew it would make me laugh.  As I would also giggle whenever he ate, as some crumb of food would inevitably get caught up in it in the process.

Another memory is of his spontaneous hijinks in the kitchen, whenever Mom would let him break into her domain.  My mother made food that made you know, in your bones, you were well cared for.  The sort that are comforting touchstones that in adulthood serve as Proust's Madeleine in their ability to whisk me back a decade ago to her kitchen as I now cook them.  My father, however, was a mad wizard at the stove.  If the notion popped into his head to cook, the best thing to do was to rush to the kitchen doorway and watch the fun.  There were no sweet moments of helping chop or stir like there was with Mom.  Just a flurry of flour, the rattling of odd pans and in the end, fantastical dishes I had never knew existed.  They were most often inspired by his Southern-American roots, though I don't know how much of that I realized at the time.  This meant Louisiana crab cakes stacked in high towers and made with mascarpone, étouffée with olives and saffron, and once, as I watched in awe, he stuffed apples with golden raisins and brown sugar and then, with his long fingers wrapped them whole in pastry dough to bake.

I now know these are called Apple Dumplings and the recipe is rather common in the South.  But to me they will always be magic, and they will always remind me of Dad.  Last night I had my first real desire to cook something since returning from Oklahoma.  The choice for me was clear.  It would be Apple Dumplings.  I realize I am truly biased here, but I have to tell you that this is the best version you are apt to taste in your life.  It's rich without being cloyingly sweet, and fun and easy to make, though you'll look like a gourmand when it's served at the table.  Please trust me on the crème fraîche, and leave it unsweetened for your first attempt, at least.  It's nutty and perfectly lush with the apple and crusty pastry.

Just remember to check your mustache, should you have one, for crumbs while rapturously enjoying this... I can nearly guarantee you you will have some.


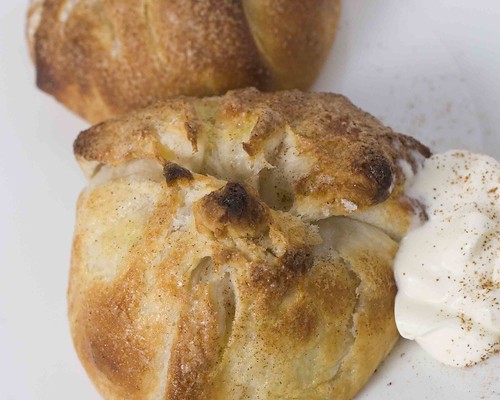
Recipe: Apple dumplings with cardamom and crème fraîche


What you need to get..

For the dumpling base...
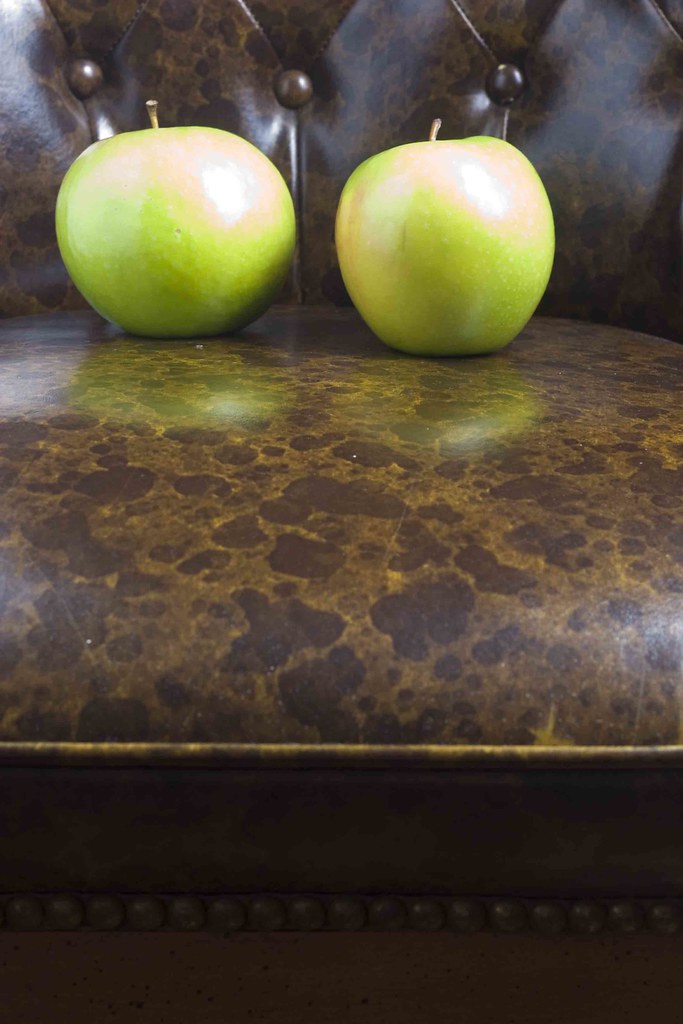
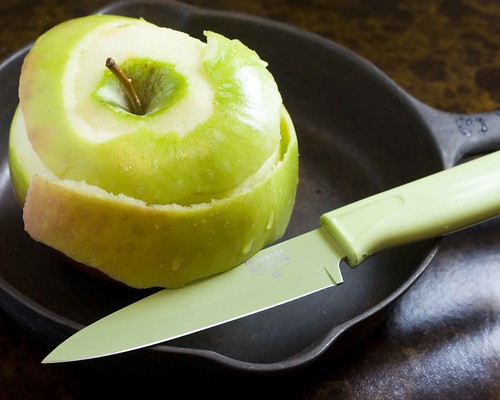
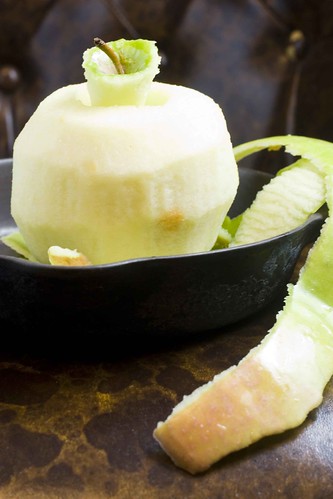
4 Granny Smith or other tart apple, peeled and cored, but keep whole
4 raw flaky biscuit dough rounds (premade and found in cans in refrigerated sections in the US) or 1 sheet puff pastry dough (make it yourself, or buy frozen and thaw)

For the filling...
4 tablespoons light brown sugar
1/8 teaspoon ground cardamom
1/4 teaspoon cinnamon
1/8 teaspoon ground ginger
2 tablespoons golden raisins
2 tablespoons unsalted pistachios (optional)

Other ingredients...
1 egg, beaten, for sealing/glazing dough
White granulated sugar for dusting dumpling tops
AP flour for rolling biscuit rounds
Unsweetened crème fraîche for serving OR unsweetened whipped cream, or cream lightly sweetened w/honey

What to do with it all...

Preheat oven to 400˚F.

Place peeled/cored apples in a microwave safe dish and microwave on 50% power until fork-tender (5 - 7 minutes for most).  You can also bake for 10 - 20 mins at 400˚F lightly covered in tin foil for same results.  Once tender, remove to refrigerator to cool.

While your apples are cooling, mix the filling ingredients and set aside.

Roll out each biscuit to about a 7 - 8 inch round (depending on the size of your apples) on a floured surface.  Place one apple on each round and fill each with 1/4 of the filling mixture.

Brush beaten egg on dough around apple, then bring up the sides to wrap the apple.  Seal and finish with a twist at the top of the apple.  Brush outside of dumpling with a little more egg, then dust with white sugar.

Place your sealed dumplings on a baking sheet, and bake for 15 - 18 minutes, or until golden.  Serve with crème fraîche and a dusting of cinnamon.

Friday, February 5, 2010

Midweek Meals: Healthy Delicious Lima Bean Spread with Olives and Yogurt OR How Lima Beans Are Like Christopher Walken


Ok, so I'm posting a midweek meal on a Friday, bu it's been quite a busy week with school and the like and I wasn't able to post photos until today... sure, I could've posted the recipe on Wednesday, but without photos, lima beans are boring in most people's opinions (though I hope you will be forever changed on that after this) and just imagine what they'd be like without the pictures?  I would be a food blog pariah overnight!

After all that bashing of poor Mr. Lima, I think I should be fair to him and tell you there's more to him then smelly, shrivel-y/mush side dish afterthoughts.  The words LIMA BEANS make children collectively shudder and dive under kitchen tables around the globe, I have no doubt.  But the Lima has a bad rep for what really is a pretty amazing little legume: healthy, easy to cook and most importantly quite tasty when properly handled.  Problem is I don't think most people know what to do with them.

Kind of like Christopher Walken.  Amazing actor, right?  I know if I were a Hollywood director, I would be looking at him and thinking "Wow, this dude is freakin' amazing... but how the heck do I cast him?"  He can't play a down and out single father or run around the screen with a gun searching for the kidnapped Declaration of Independence, now can he?  His lines would take 5x as long to say, for one thing.


Just like Mr Walken, the lima bean can't just be thrown into a dish willy-nilly and without taking into consideration its special set of talents. For one, limas have a very nice rich/butter flavor and texture if they're not overcooked.  This recipe takes the lowly lima and puts him in the role he deserves: as a healthy, tasty and even elegant spread that makes a great midweek guilt-free snack!


Oh, and limas are full of fiber, magnesium and iron.  They're said to reduce cholesterol and even have a property that is supposed to "detoxify" bad sulfite preservitives (like in red wine).  The recipe also has garlic, yogurt and olive oil for added health points!


Recipe: Lima Bean Spread with Olives and Yogurt


What you need to get...

1 pound fresh or frozen lima beans (if fresh, blanch first in boiling water for 5 minutes)
2 cloves of garlic, minced
1 tablespoon dry Greek herb mix (dill, oregano, mint, rosemary)
1/4 cup plain yogurt (thick or Greek-style preferred)
10 pitted kalamata olives
1/4 cup olive oil
Salt to taste (won't need much)

What to do with it all...
  1. In a medium saucepan, heat olive oil on medium and add lima beans and herbs. 
  2. Saute until soft and very little color (about 5 mins)
  3. Add garlic and remove from heat - allow to cool slightly (don't let the garlic cook much, or it will get bitter)
  4. Using a slotted spoon, transfer lima bean mixture to a food processor (leaving the olive oil to add back later)
  5. Add olive and blend - pouring olive oil in a steady stream to incorporate - until mixture is spreadable but still a little chunky
  6. Fold in yogurt and serve with whole wheat bread or pita, crudites, or heck, toss with pasta or layer in a veggie lasagna!

Wednesday, January 27, 2010

Midweek Meals: Healthy, Quick Mediterranean Vegetable Saute

Vegetables are amazing.  In looking up nutritional content for the ingredients for a midweek meal, I learned some very nifty things about what I was eating...


Eggplant - Is a fabulous "diet" veggie.  It's low in fat and calories, high in thyroid-supporting manganese and a good source of fiber.  Another interesting thing about eggplant?  It has more nicotine than any other edible plant!  Though you'd have to eat a bushel of eggplant before you reached the concentration of nicotine found in just one cigarette, so it's probably not the best idea to light one up, sorry.

Cauliflower - Considered a "nutritionally dense" food, cauliflower is a happy place to find vitamin C and a host of phytochemicals to fight cancer.  There are also studies that show it may work as a estrogen regulator (due to indole-3-carbinol) and glucosinolates that could help your liver detoxify.  Happy news for pub crawlers!

Chickpeas (garbanzos) - A nice low-fat source of protien and fiber.  Tossing a can of these precooked babies into your veggies gives your 29% of your protien in every serving.


Green (or French) beans - Great for your bones as they contain 25% of your vitamin K in each serving (helps fight osteoperosis), and a good amount of calcium.  Many sources believe that green food sources of calcium are betterfor the body then dairy sources, too, by the way!  I know my favorite clinical professor way back when I was in school as a bodywork therapist always paraded that theory.

In 2010 I'm making efforts to revive an old way of eating that worked really well for me, but I just got away from.  On the weekdays, I would focus on vegetarian and seafood meals only and enjoy meat only on the weekends.  I always felt like I had great energy when I followed this with care.  The problem came in when I was too busy to make proper meals and ended up eating potato chip dinners.  Bad, bad!  That's where having some nice pre-planned recipes that I love come in handy.  For me, it's motivational to know why the foods I'm preparing are good for me, too, so I've been doing my research!

Essentially, these recipes are going into a sort of food journal for me to improve my eating habits.  In doing so, I figured why not share them with all of you, too?  I'm planning to add some recipes that are based on fun healthy foods lists (if such a thing can be called fun?) such as the recent New York Times article on The 11 Best Foods You Aren't Eating (thanks to Cheryl for printing that out for me!).

So what do you think?  Would you like to see more recipes like this one?  What are some of your favorite healthy foods to include in weekday meals? 

Recipe: Healthy Quick Medditerrean Vegetable Sautè


What you need...

1 can chickpeas
3 cups chopped eggplant
1 red bell pepper, chopped
1/2 pound whole fresh green beans
3 cups chopped cauliflower florets
2/3 cup chopped yellow onion
2 tablespoons tomato paste
3 cloves of garlic, crushed
1 tablespoon dry dill (or small bunch of chopped fresh)
1 tablespoon dry oregano (or small bunch chopped fresh)
1 tablespoon dry mint (or small bunch chopped fresh)
1 1/2 teaspoons allspice
1 teaspoon tumeric
1 lemon, juiced and zested
1 cup vegetable stock or water
Olive oil for sauteing
Salt and pepper to taste

What to do with it all...
  • Heat (on medium) enough olive oil in a large heavy bottom sautè pan to coat it
  • Add your onions and cauliflower florets and allow to sautè for 3 mins or until they get a fragrant
  • Add eggplant, red pepper and green beans and cook for another 5 - 8 minutes on medium, stirring occassionally
  • Add all the rest of your ingredients, toss/stir to combine and cook on medium-low until cauliflower is just fork tender (about 10 mins)
  • Serve over rice!

    Saturday, January 23, 2010

    Pursuits in baking - Easy Blueberry Lemon Bundt


    So, I've decided to start baking more.  I've hesitant to bake much for years, limiting myself to just flipping thru baking and decorating books and vicariously making alterations and imagining the perfect, awe-inspring results.  The reality, I felt, would be much different.  Exploding muffin tins, caved cheesecakes and gravity-oppressed souffles haunt my dreams.


    I'm not exactly sure why I have this primal fear of desserts.  Perhaps starting up now will reveal a repressed memory of a bananas foster gone wrong setting my pigtails a-flame as a child?  Or maybe in another life I was flattened by a rogue 50 lbs bag of flour that leapt from a high shelf at the General Store?  More likely it's a simple fear of failure... and the mess this will turn my kitchen into on a regular basis.

    All of that being said, I'm excited to branch out into the baking world... and to be sharing it with all of you.  Hopefully they're be lots of fun to be had, and probably a disaster or two to laugh about.  I mean, seriously, look what I do when I just taking PICTURES of baked things.

    I thought I'd start out with some baby steps here and explore a couple of recipes that almost require a cake mix.  I say "require" because I've learned the hard way that adding things willy-nilly to pre-set cake recipes can get you into lots of trouble.  Boxed cake mixes, besides being fool-proof, contain emulsifiers that allow you throw in additions without making much, if any, changes to the mix recipe.


    So here is my first project.  Be sure to check out the wonderful Carol Egbert's site for another project I guest posted on rainbow cupcakes using all-natural color - it should be up soon!


    Recipe: Blueberry Lemon Burst Bundt Cake

    What you'll need...
    One box vanilla or white cake mix (you can also use lemon if you really want lemony cake!)
    PLUS
    Whatever ingredients the cake mix calls for
    1 cup of plain yogurt (you can also use blueberry yogurt to really up the blueberry flavor!)
    1 cup frozen or fresh blueberries
    1/2 cup water
    The zest and juice of one lemon
    1 teaspoon of turmeric (optional, for bright yellow color - don't worry, your cake won't taste like turmeric!)

    Special equipment: 12 cup bundt pan, small sauce pan, hand blender or food processor

    What to do with it all...

    Preheat oven to temperature according to boxed mix for a bundt pan
    Liberally grease your bundt pan 
    Add blueberries and water to a small saucepan to simmer for 5 mins, or until thawed (if using frozen) then allow to cool
    Mix all cake mix ingredients according to directions, folding in the cup of yogurt, lemon juice and zest and optional turmeric
    Puree your blueberries using a hand blender or food processor/stand blender
    Pour puree into your cake batter, but do not stir
    Pour batter into your bundt pan and bake according to box instructions (your cake may take a little longer because of the additions)
    Remove after baking and allow to cool before inverting and removing
    Glaze with a simple syrup, honey or simply dust with powdered sugar!

    Wednesday, January 20, 2010

    4 Best Whimisical Hors d'oeuvres: Thai Pumpkin Wonton Cups


    This is the last in the series of 4 hors d'oeuvres put together for the new decade.  This one may not have eyes, but I think it still qualifies as whimsical.  The colors are oh-so-pretty, and these are fairly simple to make ahead and reheat for guests just before spooning on the fresh onion salsa!


    What you need...

    For the filling
    1 can pumpkin puree
    1 cup coconut milk
    1 tablespoon fresh grated ginger
    1 teaspoon salt
    1/4 teaspoon sugar

    For the salsa topping
    1/2 medium red onion, sliced thinly
    1 bunch cilantro leaves, roughly chopped
    5 red chilies
    1 lime, juiced and zested
    Salt and pepper to taste

    For the cups
    1 package round wonton or dumpling wrappers
    Sesame oil for brushing

    Special equipment: pastry brush, mini cupcake tin


    What to do with it all...
    Preheat your oven to 350 degrees
     
    Combine your salsa ingredients and set aside 


    Brush one side of each wonton wrapper, and then place into a mini cupcake well, oiled side down


    Combine all of your filling ingredients and spoon into each wonton (enough to reach the brim of the pan)


    Bake for approx 15 mins or until wontons are golden


    Remove from oven and spoon a little salsa into each cup


    Done!


    Thanks for following the whimsical hors d'oeuvres series.  Here's a look at the previous 3!

    Olive penguins and mozzarella snowmen


    Tomato bisque shots and mini grilled cheese


    Olive oil blinis and fried quail eggs (mini pancakes and eggs)


    Saturday, January 16, 2010

    The best whimsical hors d'oeuvres - Mini pancakes and eggs {Olive oil blinis with quail eggs}


    Here's the 3rd in my January series of whimsical hors d'oeuvres: the mini pancakes and eggs!  The idea came from the cartons of quail eggs I continually pass in the Vietnamese markets near my house.  They're one of those things you just need the right excuse to buy... and here it is!


    In Chicago, Chinatown and Little Vietnam are great places to find fresh quail eggs.  You can also sometimes find them at gourmet, specialty or various Asian grocery stores.  There's not a huge flavor difference, in my opinion, between quail and chicken eggs - perhaps a bit gamier, but nothing off-putting to be sure.  The yolks are plump and rich, the whites fry up nicely.  I'd say the biggest thing to be aware of is that the membranes on the eggs are usually pretty thick.  Couple that with their tiny size and cracking them are a little bit more of a challenge... though I have freakishly doll-sized hands so it's not really so much of an issue for me!


    Gaaaah!  Mini hands!!!


    Recipe: Mini pancakes and eggs {OR} Olive oil blinis with quail eggs


    What you need to get...

    For the blinis (makes approx 12):
    1/2 cup flour
    1/4 teaspoon salt
    1/4 teaspoon baking powder
    1/2 tablespoon sugar
    1 egg
    1 cup milk
    1 tablespoon olive oil
    Butter for frying

    6 fresh quail eggs

    Optional toppings: caramelized onions, bacon crumbles, fresh salsa, fresh dill, creme frache


    What to do with it all...


    Heat your griddle or non-stick pan on medium heat
    Combine the blini ingredients (except the butter) and mix until blended
    Melt enough butter to just coat your frying surface
    Pour about 2 tablespoons of batter onto your cooking surface for each blini
    Cook on each side for about 1 minute on each side, or until golden
    Set aside in a stack and keep in a warm place, such as unheated oven
    Add a little more butter to fry your eggs, cracking each individually
    Fry for about 3 minutes, or until whites are set
    To serve: Stack 2 blinis on individuals plates, top with one fried quail egg, accompany with one or more toppings on the side (optional)

    Makes 6 pieces


    Friday, January 15, 2010

    Reinventing the Lamington cake: LAMBington cake "pops"... PART TWO!

    Finally after much smoke and messy chocolate, the LAMBingtons photos & recipe is here!


    Introducing...

    Mortimer - the Traditionalist:


    Clementine - The Sweet One:


    Hubert - The... One That Got a Little Too Close to the Photo Lights and Got Melty:


    As I mentioned yesterday, I had a little fire while taking pictures of these little guys, so I had to delay my REAL post until now.  So here they are, and if I must say so myself, they are rather adorable!  Thanks to Mr. P for creating a brilliant challenge over at Delicious Delicious Delicious He asked everyone to reinvent the lamington cake - the famous Australian dessert.  I thought, well, Australia has lots of lambs, right?  And "lamington" sure is close to LAMB...ington... soooooo....

    I decided to model these little babies after the one and only Bakerella basic recipe for cake pops.  Those adorable, one-of-a-kind masterpieces that you don't even have to like cake to enjoy looking at for hours.  After making these, I searched her site and found that she even had some little sheep pops already!  They're very different from my guys, but I have a feeling if you put them all together in a room with some cocktails, they'd get along really well.  Obviously my sheep are not actually "pops" as they have legs... made out of plain Pocky sticks!  But the cake ball recipe is Bakerella's.  It was Jason's idea to add the chocolate eyes, by the way, and I'm so glad.  I really think they make these little guys.  He's brilliant!


    Have you ever been the black sheep in the family?  This guy knows your pain!

    So without further ado, here's my version of the lamington cake... I'm probably going to come back to this post to add more instructional photos and some better lit lamb photos once my new light arrives - yes, did I tell you?  I bought a new light to replace my burned light box.  It is, incidentally, the same one Bakerella uses *proud smile*.  Until then, I'll be feeling a little *ahem* SHEEPish about my sadly lit photos...

    Recipe: The LAMBington Cake


    What you need to get...

    1 box of lemon or vanilla cake mix (plus ingredients on the back of the box per baking instructions)
    1 can of vanilla frosting (16 oz)
    1 package of white chocolate baking/melting chips (11 oz)
    1 package of milk chocolate baking/melting chips (11 oz)
    1 jar of good jam or preserves (I used quince)
    1 bar of milk chocolate, shaved (you can use chocolate sprinkles instead)
    1 cup shredded/dessicated coconut
    1 box of plain Pocky - such as "Rost" variety OR small unsalted thin pretzel sticks
    1 tablespoon Garam Masala (optional)
    1 cup raw almonds
    1 cup blanched/skinless almonds

    Special equipment: 13 x 9 cake pan, large bowl, wax paper, a toothpick

    What to do with it all...

    • For the cake oval bodies, bake your box cake according to directions for a 13 x 9 cake, adding the tablespoon of Garam Masala if desired  (also see Bakerella basic recipe)
    • Allow cake to cool and crumble into a large bowl, and add your vanilla frosting by large spoonfuls and combine by hand until you achieve a consistency sort of like meatloaf - easy to form ovals
    • Using a walnut-sized amount of cake mixture, form an oval shape, then cut the oval in half lengthwise and spread a small amount of jam in between - reassemble like a sandwich and reshape to an oval
    • Cut the ends off of Pocky sticks in one-inch pieces (you want the end pieces as they will form the feet), OR if you are using thin pretzel sticks, cut them in half
    • Melt your white and milk chocolate chips in small bowls according to package directions
    • Dip your cut ends of the Pocky or pretzle sticks into the chocolate (some in milk, some in white as you wish the final colors of the lambs to be), just a scant centimeter or so and then stick into your oval, repeat 3 x until you have "legs" (the chocolate acts as a glue of sorts) - make sure your legs are at even lengths so that when you set them down later, they'll stand properly
    • Place your lambs on their "backs" on a plate or small tray under a piece of wax paper and place into the freezer for at least 10 minutes
    • During this time you can arrange your "wooling" station by spreading shredded coconut on one plate, chocolate shavings or sprinkles on another, and rewarming your milk and white chocolate for dipping
    • Remove lambs from freezer and carefully dip one by one into the chocolate color to match the legs - make sure to cover the sides and front & tail
    • Quickly move your dipped lamb from the chocolate to the coconut or shavings and coat - chocolate dries quickly!
    • Now re-dip just one end slightly in chocolate to act as glue to attach your almond face - attach the almond with the pointed end so you have a rounded face
    • To make eyes you can either just dab on milk chocolate with the toothpick, or attach small bits of solid chocolate that you've rolled between your fingers just a little to soften and make round and attach that using the melted chocolate and the toothpick
    That's it!  The LAMBington!

    Wednesday, January 13, 2010

    Reinventing the Lamington cake: LAMBington cake "pops"... PART I

    Yeah... this is Part I for a reason that was not in my plan when I started putting this little guy together tonight.  But a lot of things weren't in my plan when I started this tonight...

    First things first, though.  Mr. P of the venerable Delicious Delicious Delicious is holding a Lamington competition this month.  A very cool idea that I immediately had an entry in mind for.  While that entry is now, at this moment, sitting in my dining room, the rest of the plan (lots of brothers for my little entry and lots of pretty photos to accompany them) was not to be tonight.

    The reason why?  I nearly set my house on fire with one of my photography lights.  Yep.  The photo says it all...


    I'm a nine to fiver and I go to school, so often take my food photos at night using a little make-shift softbox light I build out of a cardboard box and and old t-shirt that I was very proud of... however, while taking pictures of my creation tonight, one of the lights tipped forward without my knowlege while I was arranging the shot and ignited the shirt part while I was fiddling with the Lamington.  NOTE: These lights are not normally that close to the lightbox, they were shifted during the "Omigod, fire!  What do I do?!  Stop Drop and Roll??!!  No... find blanket???  Maybe... Call hero boyfriend from other room to come douse the flames??!!  YES!!" part of the photo session.

    Anyways, lesson learned here is don't be cheap, even if you're a poor student, and make your own lightbox thinking it will save you money.  Saving $$$ = Flamable Materials.   So, while we had a good laugh about it afterwards (and a few beers to calm the nerves),  needless to say I now no longer have a softbox light.  Therefore, I will have to take my proper pictures of this creation in daylight tomorrow... nice and early.

    In the meantime, here is a shot in icky lighting of my entry for the very awesome contest at Mr. P's place...


    There's also a chocolate/square version of him which will be completed tomorrow (he's resting in this photo, obviously, waiting to be coated in yummy frosting)...


    Did I mention that the prize for winning this particular contest is a cookie cutter in the shape of a Welsh Dragon?  Yeah, pretty kick ace... of course, dragons breathe *gulp* ... fire...

    So until tomorrow, when I will be revealing the recipe, REAL photos, etc for this challenge... I say goodnight to everyone.  I'm off to shower off the campfire smell!

    Saturday, January 9, 2010

    Whimsical hors d'oeuvres - tomato bisque shots and mini grilled cheese!

    As promised, here's the second set of hors d'oeuvres in my series of 4 celebrating the first month of the new decade: a spicy tomato bisque with mini grilled cheese to make you go AWWWWW...

    Note: I used sake cups for my "bowls" (a housewarming gift from my friend Ivon - thanks, Ivon!) but you can use anything little like shot glasses or demitasse cups...


    Recipe: Tomato Bisque Shots with Mini Grilled Cheese


    What you need for the bisque (makes about 6 cups)...

    1 medium Vidalia or other yellow/sweet onion, diced
    2 medium carrots, peeled and diced
    1/2 cup jarred or fresh roasted red peppers, diced
    4 tablespoons butter (divided in half)
    3 cloves garlic
    3 tablespoons AP flour
    4 cups chicken or vegetable stock
    2 14.5 ounce cans of diced tomatoes (drained)
    3 tablespoons tomato paste
    1/4 cup heavy cream
    Splash of Marsala wine
    1/4 cup minced cilantro
    1/2 tablespoon cumin
    Cayenne pepper to taste
    Salt and pepper to taste

    What to get for the mini grilled cheese...

    A loaf of firm white/french bread, cut into triangles (about 20)
    Approx 1 pound of a good melting cheese: brie, Gouda, cheddar, Swiss, etc
    Butter or olive oil for pan grilling
    Other optional add-ons: olive tapenade, Ajvar spread, pesto... you name it!

    What to do with it all...

    For the bisque:
    • In a medium saucepan, melt 1/2 of your butter (2 tablespoons) and saute the onion, carrot and garlic on medium heat
    • Once they begin to brown, sprinkle flour over veggies and cook on low for another minute or until flour is well incorporated
    • Add the stock, canned and paste tomatoes, Marsala wine, and roasted peppers and bring to a boil
    • Lower the soup to medium-low and allow to cook just above a simmer until the veggies are tender
    • Use an immersion blender and partially puree the soup (you still want some chunks) - you can also do this in a blender or food processor using half the soup and pureeing then adding back to the saucepan
    • Add your cream, cumin, cilantro, cayenne, salt and pepper and remaining 2 tablespoons of butter and heat until just hot
    • Set aside until grilled cheese is ready, then add to shot glasses/cups/bowls
    For the grilled cheese:
    • Sandwich 10 slices of cheese between two triangles, smear one piece of bread w/optional spread
    • Brown on both sides in butter/oil in an oven-proof pan and transfer to broiler until golden and cheese is soft and partially melted
    • Place on the side or on rim of your bisque vessels!
    •  


    Wednesday, December 30, 2009

    Four of the best (and whimsical) hors d'oeuvres for a new year...


    So I've been thinking about this blog a lot... though you probably wouldn't realize it since I haven't really been posting as much as I should (bad, bad Mae!).  I promise I haven't forgotten about you all, quite the contrary - with a fresh year/decade coming up, I've been busy thinking about how to make a *New and Improved!* version of the site.  I'm happy to say I think I've come up with some nifty-ish ideas (I think, kinda, maybe), and you'll just have to stick around to see what I mean by that (muahaha!).

    Until then, I thought maybe I'd end this year on a classy note... and what's classier than olive penguins and cheese snowmen, I ask you?  Here's my evidence to back this up:

    a) Penguins wear tuxes, all day, every day.  That's more than even James Bond can say.
    b) Snowmen wear TOP HATS.  Just like British people.  'Nuff said.

    As for the other hors d'oeuvres on this menu, I'd say they're pretty and elegant, too.  But the most important part of all of these for me is the whimsical part.  If there's something more whimsical than miniature versions of food, I've yet to find it.  I worried these might cross the line from "whimsy" into "precious", which is the difference between, say...


    Whimsical                                                    Precious (icky/cutesy)


    ... I'm not even going to go into why this little fella on the right appears to be drinking a beer larger than his torso - as if hauling those freak-huge parsnips he's got wouldn't be hard enough sober for a six-year-old.

    In any case, as Jason gave these the thumbs up on my hors d'oeuvres (boys generally being the best alarmists for anything too "cutesy"), I think I'm in the clear by most standards as far as the "precious" quotient goes.  Rock on.

    For the next four weeks I'll be featuring one recipe a week for these whimsical hors d'oeuvres in honor of the first month of the new decade!  Why not all at once?  Well, I have to have something to persuade you to come back and visit me over and over again, don't I?  And if you're thinking "That's lame, I'm have a NYE party tomorrow that I could use recipes for!"  Yes, this might be true, so I'll give you the gist (spoiler alerts?) for the other 3 hors d'oeuvres so you can make them if you're dying to do so tomorrow... plus you could always email me at the "Contact" tab for it.  I love getting emails.  Really, I do.

    So, here is 1 of the 4 recipes for classy/whimsical-but-not-precious (and did I mention vegetarian, inexpensive and easy?) hors d'oeuvres...

    Recipe numero uno: The Winter Penguins and Snowmen (make delicious armies to command at will!)


    The penguin recipe can be found all over the web - I haven't been able to figure out where it's orginated from.  If you're the mastermind of this recipe (and can prove it) and reading this getting pissed that I'm reproducing it... well, I'm guessing you're pretty busy being pissed at a lot of people cause this thing is as popular as the snickerdoodle.  Feel free to send me a note, though, and I'll happily credit you for this awesome invention.  I HAVE changed it up from the versions I've found, I'd like to note, in that I used canned pickled spicy carrots instead of chopping up fresh ones.  Why?

    a) They're uniform and pre-cut for my ease and comfort (yay!)
    b) They're spicy, and I like spicy - I think they make these *pop* a little more then plain raw carrots - especially since California black olives and cream cheese aren't very "pop-y" on their own, though delish.

    For the Penguins you'll need...

    A can of medium California black olives
    A can of large California black olives
    An 8 oz pkg of cream cheese (feel free to flavor w/herbs, garlic, whatever)
    A can (11 oz works) of spicy carrot coins
    Toothpicks (for stabbing)


    Simply slice one side of the large olive lengthwise and fill with cream cheese (you'll probably want to clean up the cheese smears with a damn paper towel).  Cut a little triangle pie shape out of a carrot coin and insert into hole of medium olive for the beak.  Then layer as shown and skewer that little puppy with a toothpick.  The horror!

    <-- Still classy, even without a head)


    Penguin face-off!

    Now, for the snowmen, this is an idea I had myself, but it does seem like a couple other people like me (raised only children, too much time left alone with food) have had similar ideas to mine on this, though I've yet to see an exact replica when I Google'd my creation.  What can I say?  Great minds... or something to that effect.

    For the snowmen you'll need...

    Small fresh mozzarella "pearls" (available in tubs in many places)
    OR
    Substitute cream or goat cheese rolled into balls (again, feel free to flavor at will)
    Sliced seedless (English) cucumbers - not too thin as these will serve as a base for your snowmen
    Whole roasted red peppers - sliced into long, thin strips
    A can of medium California black olives
    A can of large California black olives

    Just cut as pictured below (for the top hat, you're just cutting off the very ends of the olives to make a cylinder shape) and assemble.  Don't forget the toothpicks!


    Coming up next week: Tomato bisque shots with mini grilled cheese


    Followed by: Quails eggs and olive oil blinis (aka Mini Pancakes and Eggs)


    To be concluded with: Thai sweet potato cups

    If you've enjoyed my recipes, please vote for my Vietnamese-style Moo Shu at Foodista!  :)

    LinkWithin

    Related Posts with Thumbnails