Wednesday, December 30, 2009

Four of the best (and whimsical) hors d'oeuvres for a new year...


So I've been thinking about this blog a lot... though you probably wouldn't realize it since I haven't really been posting as much as I should (bad, bad Mae!).  I promise I haven't forgotten about you all, quite the contrary - with a fresh year/decade coming up, I've been busy thinking about how to make a *New and Improved!* version of the site.  I'm happy to say I think I've come up with some nifty-ish ideas (I think, kinda, maybe), and you'll just have to stick around to see what I mean by that (muahaha!).

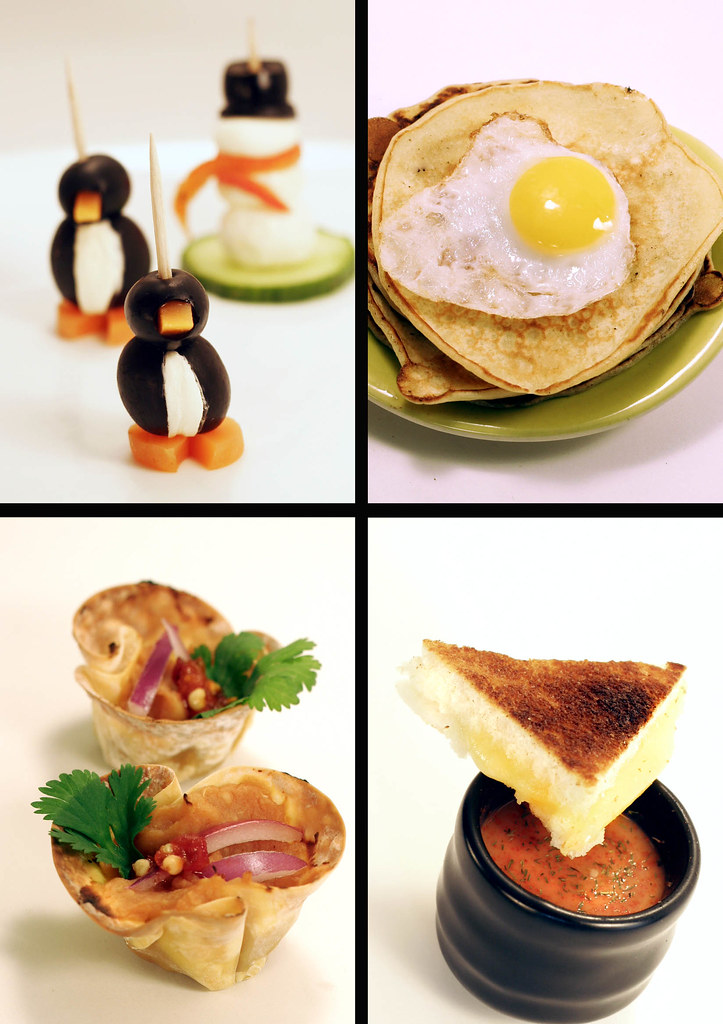
Until then, I thought maybe I'd end this year on a classy note... and what's classier than olive penguins and cheese snowmen, I ask you?  Here's my evidence to back this up:

a) Penguins wear tuxes, all day, every day.  That's more than even James Bond can say.
b) Snowmen wear TOP HATS.  Just like British people.  'Nuff said.

As for the other hors d'oeuvres on this menu, I'd say they're pretty and elegant, too.  But the most important part of all of these for me is the whimsical part.  If there's something more whimsical than miniature versions of food, I've yet to find it.  I worried these might cross the line from "whimsy" into "precious", which is the difference between, say...


Whimsical                                                    Precious (icky/cutesy)


... I'm not even going to go into why this little fella on the right appears to be drinking a beer larger than his torso - as if hauling those freak-huge parsnips he's got wouldn't be hard enough sober for a six-year-old.

In any case, as Jason gave these the thumbs up on my hors d'oeuvres (boys generally being the best alarmists for anything too "cutesy"), I think I'm in the clear by most standards as far as the "precious" quotient goes.  Rock on.

For the next four weeks I'll be featuring one recipe a week for these whimsical hors d'oeuvres in honor of the first month of the new decade!  Why not all at once?  Well, I have to have something to persuade you to come back and visit me over and over again, don't I?  And if you're thinking "That's lame, I'm have a NYE party tomorrow that I could use recipes for!"  Yes, this might be true, so I'll give you the gist (spoiler alerts?) for the other 3 hors d'oeuvres so you can make them if you're dying to do so tomorrow... plus you could always email me at the "Contact" tab for it.  I love getting emails.  Really, I do.

So, here is 1 of the 4 recipes for classy/whimsical-but-not-precious (and did I mention vegetarian, inexpensive and easy?) hors d'oeuvres...

Recipe numero uno: The Winter Penguins and Snowmen (make delicious armies to command at will!)


The penguin recipe can be found all over the web - I haven't been able to figure out where it's orginated from.  If you're the mastermind of this recipe (and can prove it) and reading this getting pissed that I'm reproducing it... well, I'm guessing you're pretty busy being pissed at a lot of people cause this thing is as popular as the snickerdoodle.  Feel free to send me a note, though, and I'll happily credit you for this awesome invention.  I HAVE changed it up from the versions I've found, I'd like to note, in that I used canned pickled spicy carrots instead of chopping up fresh ones.  Why?

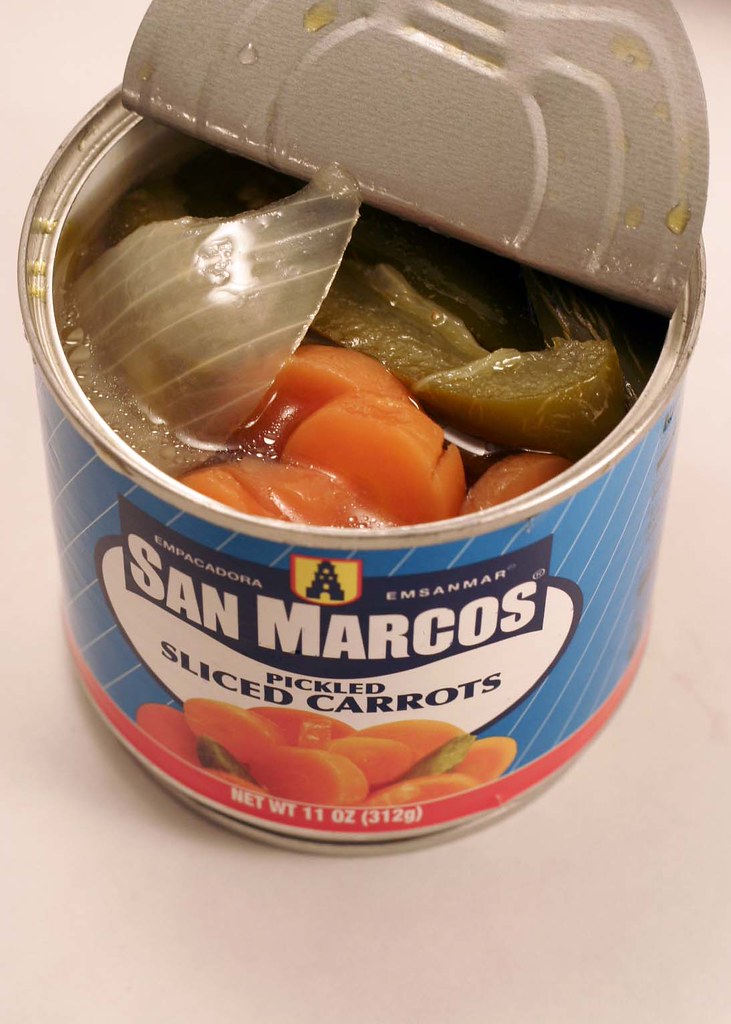
a) They're uniform and pre-cut for my ease and comfort (yay!)
b) They're spicy, and I like spicy - I think they make these *pop* a little more then plain raw carrots - especially since California black olives and cream cheese aren't very "pop-y" on their own, though delish.

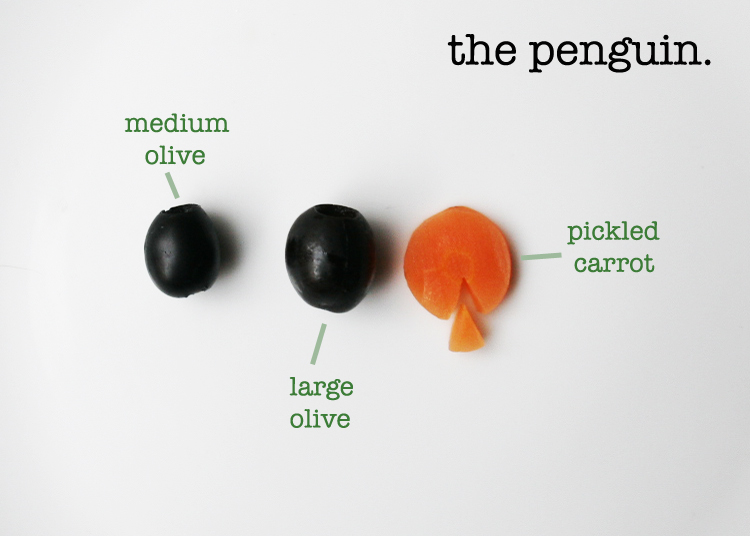
For the Penguins you'll need...

A can of medium California black olives
A can of large California black olives
An 8 oz pkg of cream cheese (feel free to flavor w/herbs, garlic, whatever)
A can (11 oz works) of spicy carrot coins
Toothpicks (for stabbing)


Simply slice one side of the large olive lengthwise and fill with cream cheese (you'll probably want to clean up the cheese smears with a damn paper towel).  Cut a little triangle pie shape out of a carrot coin and insert into hole of medium olive for the beak.  Then layer as shown and skewer that little puppy with a toothpick.  The horror!

<-- Still classy, even without a head)


Penguin face-off!

Now, for the snowmen, this is an idea I had myself, but it does seem like a couple other people like me (raised only children, too much time left alone with food) have had similar ideas to mine on this, though I've yet to see an exact replica when I Google'd my creation.  What can I say?  Great minds... or something to that effect.

For the snowmen you'll need...

Small fresh mozzarella "pearls" (available in tubs in many places)
OR
Substitute cream or goat cheese rolled into balls (again, feel free to flavor at will)
Sliced seedless (English) cucumbers - not too thin as these will serve as a base for your snowmen
Whole roasted red peppers - sliced into long, thin strips
A can of medium California black olives
A can of large California black olives

Just cut as pictured below (for the top hat, you're just cutting off the very ends of the olives to make a cylinder shape) and assemble.  Don't forget the toothpicks!


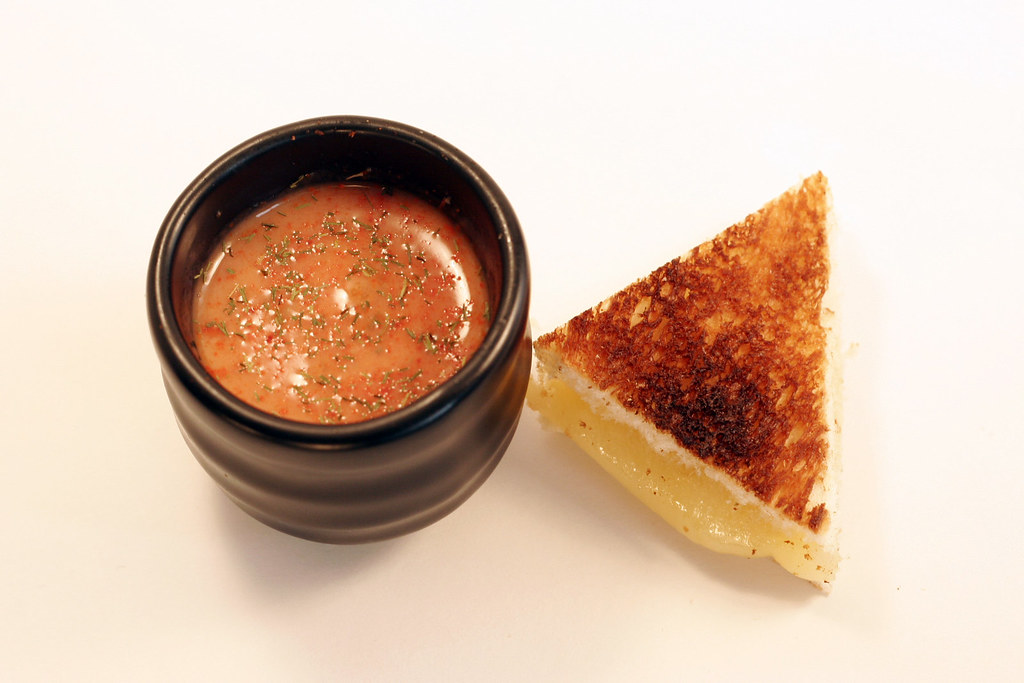
Coming up next week: Tomato bisque shots with mini grilled cheese


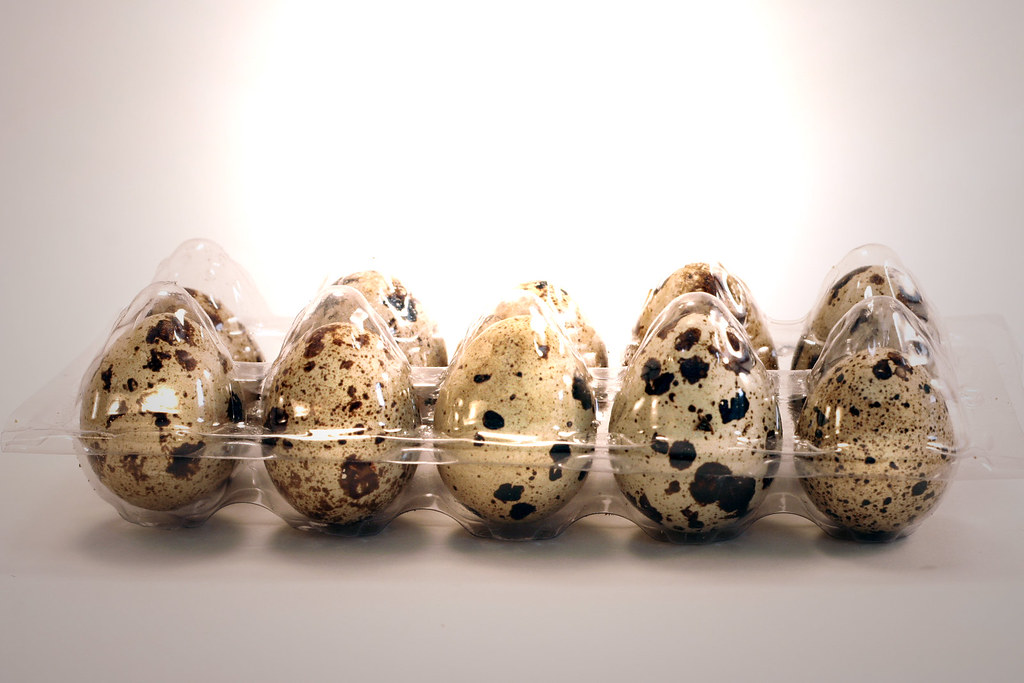
Followed by: Quails eggs and olive oil blinis (aka Mini Pancakes and Eggs)


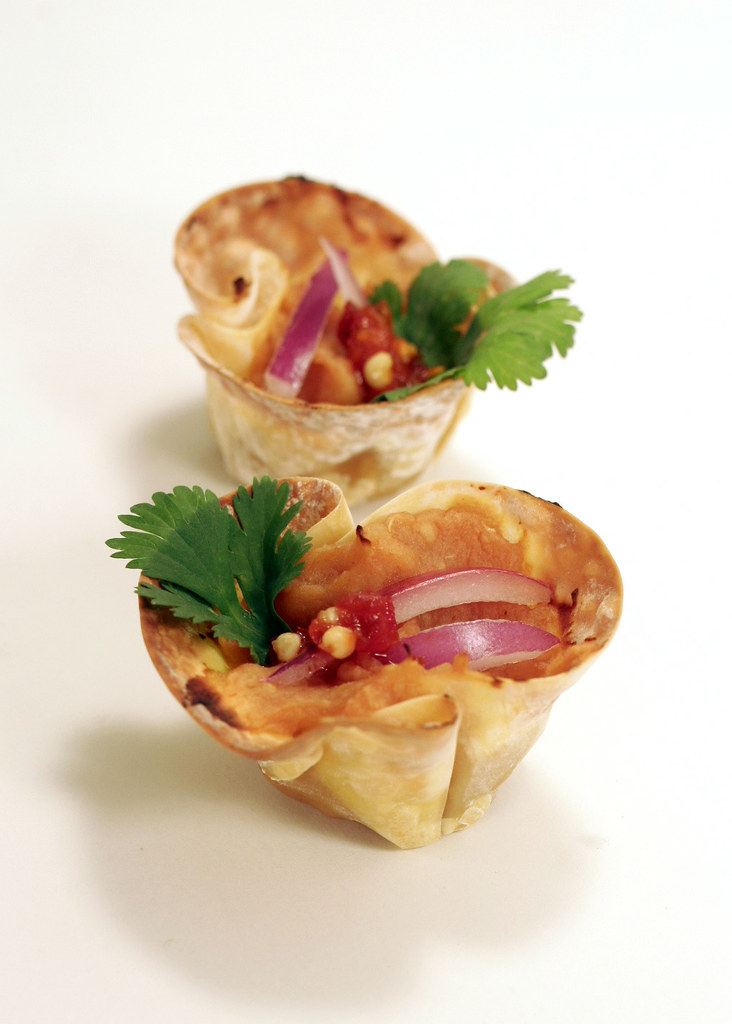
To be concluded with: Thai sweet potato cups

If you've enjoyed my recipes, please vote for my Vietnamese-style Moo Shu at Foodista!  :)

Wednesday, December 23, 2009

Ruby pasta - cooked with beets and wine!


I recently thought I'd see what it took to make some truly bright-red pasta out of your standard box of semolina shells.  Having some fresh beets on hand, I thought I'd boil them (scrubbed very well) and save the juice to cook my pasta in.  Since I'd recently seen Rachael Ray make spaghettini cooked in red wine on Iron Chef, I thought I'd supplement the beet juice with a cup of Cabernet.


Underwhelming pasta boiled in beet juice and red wine

I wasn't really expecting the results to be exactly what I was looking for... which is good because what came out into the bowl was a mass of slightly anemic purple pasta.  The wine had given a little flavor to the shells, which is nice, but the color was still off the mark. 


 Now THAT'S more like it!

The solution?  Cut up the freshly boiled beets and toss them with the still-hot pasta.  Viola!  Bright red pasta!  I tossed it with some olive oil to enhance the color with a rich sheen - then added roasted asparagus tips, garlic, salt/pepper and a squeeze of lemon!  So pretty, surprisingly easy... and oh so YUM! 

I'd love to hear from anyone who has tried cooking pasta in wine or beets (or both!)... or just any unconventional pasta-cooking wisdom!

PS - Yes, I took these pictures on the snow-covered picnic table in the backyard of my building... SO COLD, and yes, I looked insane to my neighbors.  Yay!

Wednesday, December 16, 2009

Preserving a Dish with a Rare Bird


I think maybe the title for this post sounds like a sentence out of a Gertrude Stein manuscript, but I promise it all makes sense.  The idea for this post came from my recently renewed fascination with homemade jams - which I'm sure is part of a larger infatuation with all things "throwback" or "vintage".   For me, the leading preservationist in the jam craft are celebrities nearly as much as Brad Pitt might be to the average person: June Taylor, Eugenia Bone, and, of course, Christine Ferber of Mes Confitures fame - they're the people I'd like to see on Conan.  While I don't exactly hang their posters around my kitchen or anything, I'm pretty sure I'd ask for their autographs and to take a picture with them if I were to bump into them on the street, and that's more than I'd do for any of the cast of Gossip Girl.


Lately here in Chicago there has been a new name on the scene that has been continually peaking my interest: Elizabeth Madden of Rare Bird Preserves.  Madden's jars of unique fruit combinations were available this past Summer at my local farmer's market in the Andersonville neighborhood.  I'd find myself overwhelmed with curiosity and pass by the crowded booth once, twice, and then a third time: it seemed whenever I happened by there was never a lull in the groups sampling for me to be able to make my move and start asking my gazillion questions.  I limited myself to mutely sampling from jars with rapturous parings like strawberries and chocolate.

Thankfully later in the season the Chicago Reader featured an article about Rare Bird and it's mastermind that answered most of the questions for me, and only served to validate my interest.  To boil it down (get it?), here are the things that I love about Rare Bird:

  • Preserves are made in small batches, out of in-season fruits.  If the ingredients aren't up to par, that particular recipe is on hold until they are.
  • Madden uses natural pectin sources, like lemon and apple peelings.  No powder in sight.
  • The varieties are the definition of whimsical: from Chocolate Orange to Meyer Lemon Rosemary.

At this point I should probably go on record to say that as of the writing of this, the people at Rare Bird, including Ms. Madden have no idea who I am, and have likely never bumped into Peas Love Carrots during a web search.  I decided to whip up a recipe based on one of her preserves just because it seemed like a nifty thing to do - and a good excuse to buy a jar and steal spoonfuls during cooking.  

So here you go - if you're not fortunate enough to be able to get your hands on this awesome preserve, I've included substitutes you can use, and even just any preserves as close to this one could work, I'd suppose... it just won't be as much fun to snack on the leftovers...

Five Spice Pork Loin with Apple-Hibiscus-Plum Glaze


What to get...

1 whole boneless pork loin - fat on (approx 2 lbs)

For the wet rub...

2 tablespoons of 5 spice powder
1/4 cup brown sugar
4 tablespoons soy sauce
2 teaspoons cracked Szechuan peppercorns (or regular)
2 cloves of garlic - crushed
Salt to taste

For the glaze...

1/2 cup Rare Bird Apple-Hibiscus-Plum preserves

- OR -

1/2 green apple peeled and julienne
3 tablespoons apple jam
1 plum, skinned and chopped
1/4 cup hibiscus tea, brewed
(Add all ingredients to a small sauce pan and simmer for 20 mins or until thick)

What to do with it all...

Preheat oven to 350 degrees
Combine rub ingredients and coat pork loin with them
Heat a large oven-proof skillet on high and sear your loin on all sides until brown
Spoon over preserves or substitute glaze
Place skillet in the oven and roast until internal temperature is 145 degrees (about 1 hour) for a slightly pinkish center
Broil on high for 1 - 2 minutes on top rack to get a little extra caramelization on the glaze
Remove from oven, cover loosely with foil and allow to rest for 15 - 20 minutes
Serve with braised red cabbage

Please vote for my Vietnamese Moo Shu Pancakes on Foodista!


Sunday, December 6, 2009

Accidental Celeriac - How Soup Became Salad


The other day I set out to make a celeriac puree soup.  Nothing mind-blowing or inventive, just the standard accompaniments of potatoes and leeks, some cream and good stock.  Jason and I had found some nice celeriac at the only real year-round farmers market in Chicago, Green City, and having never worked with this nobbly root before, I thought I'd play it safe for once.  It was not to be, however...

Lots of the coolest inventions have come from mistakes: The microwave, penicillin... even the cornflake came about when Dr. Kellogg let a pot of boiled wheat for hospital patients overcook.  Now, I'm not trying to say I invented something to approach any of these inventions, and I am even pretty sure plenty of other people have discovered this, but for me, it's a novel and new idea... so I'm really just asking that everyone humor me for a little while.


What happened was,  I decided to pan saute the root pieces a little before adding to the stock and let one batch go a little too long, and with a little too much olive oil.  This left me with pan fried celeriac.  Hmmm... no good for soup, I shrugged and slid the rejects to a "Mathea Eats Mistakes" pile.   As I reached over to sample my pile, I realized the golden little pieces looked an awful lot yummy potato wedges.  A sprinkling of sea salt and a nibble confirmed these were not rejects at all: they were crisp on the outside, with a tender, almost artichoke heart quality on the inside with that same twinge of sweetness.  Then there was the bright green of the celery to remind you that this was no potato, oh no... There would be no soup tonight.

Plated with some greens, small heirloom or grape tomatoes (they don't have to be fancy-pants), bacon and a Dijon vinaigrette these were super.  I was happy about my little discovery - enough that I didn't even care that I didn't get to eat my Mistakes pile all by myself...


Recipe: Accidental Sauteed Celeriac Salad


For the vinaigrette...

4 tablespoons extra virgin olive oil
1 tablespoon minced shallot 
1 tablespoon sherry vinegar (or red wine vinegar)

1 teaspoon fresh lemon juice
1 teaspoon Dijon mustard
1 tablespoon minced fresh dill (or 1/2 tablespoon dried)

For salad...

1 large celeriac bulb (celery root)
3 cups mesclun lettuce mix
3 strips bacon - diced and cooked
1 cup whole small tomatoes (such as grape)
2 tablespoon olive oil
Sea salt & cracked pepper to taste


What to do with it all...


Start with your vinaigrette by adding shallots to vinegar and lemon juice, allowing them to "pickle" for at least 5 minutes - 15 being ideal
In small bowl, slowly stir olive oil into mustard in a small bowl with a wooden spoon
Add dill and shallot/vinegar/lemon juice mixture to olive oil/mustard and stir - set aside
Prepare celery root like you would cut a pineapple - cutting off top and bottom, cutting away outer skin and inner, spongy core
Slice remaining pieces into thin wedges
Coat a medium saute pan with 1 tablespoon olive oil and heat on medium
Add your wedges in a single layer, fry on one side, then other until golden
Remove and transfer to paper towel to drain excess oil - salt and pepper wedges to taste
Repeat until all wedges are cooked
For one large salad: toss your greens and tomatoes with vinaigrette, adding salt and pepper to taste
Top with celeriac wedges and bacon
For individual salads: toss your greens and tomatoes with vinaigrette and salt and pepper, reserving a tablespoon for plating
Divide greens and tomatoes to plates, top with celeriac and bacon
Spoon reserved vinaigrette over celeriac

Thursday, December 3, 2009

When Caramel and Tomatoes Get Together, Beautiful Savory Tarts Are Born


In edible chemistry news this week, the Tomato Federation sent a delegate to the people of Caramel on Tuesday.  The aim of this mission was to help these two cultures better understand one other thru an exchange of good will - therefore ending a centuries-long feud between their nations.  The good citizens of Onion and Rosemary were kind enough to mediate this meeting, and reported this momentous occasion a great success. 

As a symbol of their newly forged peace, the nations created a tart... a tart so delectable that one might wonder if tomato and caramel have stayed apart this long in order to preserve us humans from the catastrophic possibility of tearing apart our own society - battling each other for just another slice of this heavenly invention.  What the future holds for these two races is hard to say, but one thing is clear... it's a little brighter now.
 

So, OK, a while back I read an article in the New York Times about a caramelized tomato tart Tatin.  I'm not normally the sort of person that likes major collides between sweet and savory (I mean, the bread and butter pickle is gross, come on), but I was intrigued by this recipe.  Maybe it was just the high praise Melissa Clark had for this dish, and her mouthwatering descriptive powers, but I couldn't get this notion out of my mind.  Tomato and caramel... caramel and tomatoes...

So here's my own version of this lovely dish.  I've made a few key changes for the sake of something different - this is not a Tatin, as there is no puff pastry dough, but instead a pâte brisée dough - the sort used for traditional savory, flaky tart crusts.  The recipe for the crust can be found at very talented Erika the Pastry Chef at Home's website.  I laced in some fresh rosemary during the incorporation of the butter step, but if you're using a store bought crust, you can leave it out or add it to the bottom of the shell when you're filling it.  I like both versions of this tart, but the pâte brisée version has a nice flakiness to play off the juicy tomatoes that I love.  I also take out the step of the separate caramel sauce prep and create the sauce with the onions in the pan (since my version isn't inverted for baking).


Please don't let the idea of the caramelizing throw you off on this one, it's not a cloying-ly sweet dish whatsoever - if it were, I would not like it.  Instead, the caramel lends a pleasant, binding gooey-ness to a lovely toothsome filling.  I hope you enjoy it - just not too much, we don't want to start any civil wars over a tart...

Recipe: Caramelized Tomato Onion Tart with Rosemary Crust


What to get (adapted from this recipe)

1 premade pie crust, or use the recipe found here to make your own and add 1 TB fresh chopped rosemary

1 pound of cherry or grape tomatoes (I used the mini heirloom tomatoes from Trader Joe's)
4 tablespoons unsalted butter
3 red onions, sliced thin
1/3 cup of white sugar
1/2 teaspoon sherry vinegar
1 tablespoon fresh minced thyme
Salt and pepper to taste

Optional add ins:

1 cup crumbled goat cheese
1/4 cup pitted, chopped Kalamata olives

What to do with it all...

Preheat your oven to 425 degrees
Shape your pie crust to a 9 inch tart pan and refrigerate, covered, until ready to fill
In a medium skillet, heat your butter and add onions and salt and pepper to taste - cook on low for 15 - 20 minutes, or until translucent
Stir in sugar and vinegar and thyme and allow to dissolve, stirring
Cook on low until bubbling
Remove your tart crust from refrigerator and add your whole tomatoes - also olives/cheese if you choose to use these

Top with onion/caramel mixture and bake in oven for 25 mins, or until crust is browned and tomatoes are softened and caramelized by the sugars

Thanks for reading and please vote for my Vietnamese Moo Shu Recipe over at Foodista!

Saturday, November 28, 2009

Vietnamese-Style Moo Shu Chive Pancakes (mù xū bǐng) with Turkey

Vietnamese food is all about the five senses: the visual explosion of colors in green basil and red chilies, the crunching sound of fresh carrots and bean sprouts, aromatic mint and fish sauces, the variety of textures for mouthfeel, and... oh yeah, taste is pretty important, too.  In fact, Vietnamese dishes rarely leave out any part of the tongue with spicy/sweet/tangy mixed with bitter herbs and salty condiments... commence Homer Simpson drool... NOW.


It seemed a natural progression for leftover turkey or any roast fowl (I used chicken, duck would probably be fantastic if I'd had some... doh!).  Turkey not being the most flavorful of meats on it's own, the kick of some cilantro and ginger sounded pretty good.  Since the leftover meat is easiest to remove from the carcass in shreds, I also thought some moo shu would work, and that would mean pancakes.  I didn't have the ingredients on hand to make Vietnamese pancakes like bánh xèo, which require rice flour and coconut water.  Therefore, I decided I'd have to go rogue and mix some Chinese moo shu pancakes (mù xū bǐng).  


I know technically this dish is a "fusion" dish, but I'm not a fan of this term, mainly because I see it over-used by restaurateurs looking to up the hip-o-meter in their menu.  I am not hip - I don't own an iPod since my last one was stolen over a year ago and I don't even miss it, I don't wear jeans that cost more than $40, and I don't get my hair cut into a style named after a celebrity.  Therefore, I feel as ill-suited to the term "fusion" as I do to, say, diet pills or Red Bull/vodkas.


So okay, the "fusion" part will stay in sarcastic little quotes, if that's okay with you guys.  Now, about these pancakes.  I found the basic recipe from Emeril Lagasse and I must not've read thru it properly the first time because I didn't realize I was essentially making pastry dough pancakes.  If I'd known that before making them, I probably would've closed the page and looked for something else to make.  Why?  Because I'm afraid of pastry dough.  Everyone makes it sound like some huge ordeal of rolling and buttering and layering... as someone who cooks way more than bakes, I just imagined myself collapsing in a tearful mess about halfway through - covered in flour with bits of dough mashed into my hair.  I'm wearing a chef's hat in this dream sequence, and it's slumped in defeat, too...


I'm glad I didn't read the recipe through properly as it turns out.  By the time I got to the layering part, I was having too much fun to care.  Yes, again this might be because I am not hip, and therefore have fun doing not-hip things like rolling dough on a Friday night, but who cares?  I was giddy with the realization that this was far from "work"; I was humming and I rolling out little disks, brushing them with sesame oil, and sticking some chives in between the layers... then a little sizzle on the griddle pan and there they were!


Pastry dough, watch out, cause I'm coming for you next...


Recipe: Vietnamese-style moo shu turkey and pancakes


What you need for the chive pancakes*...


1 1/2 cups flour (plus a little extra for rolling)
Pinch of salt
1/2 cup boiling water
2 - 3 tablespoons cold water
3 tablespoons sesame oil
A few sprigs of fresh chive, chopped coarsely


*makes 12 pancakes


What to scrounge around for for the filling...


2 cups of shredded, cooked poultry (leftover turkey, chicken, duck, etc)
1 cup each of shredded veggies (carrots, corn, cabbage, mushrooms)
1 egg, beaten
1/2 cup of onions, scallions, etc
3 cloves of garlic
Nob of fresh grated ginger or 1 1/2 teaspoons powdered
A few dashes of fish sauce
Equal parts soy sauce and brown sugar (dissolve brown sugar in soy sauce), amount to your taste and quantity of other ingredients
Sesame oil for cooking
Salt & pepper


What you need for the garlic/chili sauce...


2 parts red chili sauce (such as sambal oelek or sriracha )
1 part sesame oil
Crushed garlic and fresh ginger (to taste)


What you need for other accompaniments...


A handful each of fresh mint, Thai basil (or sweet), and cilantro (any or all)
Fresh bean sprouts (optional)
Shredded carrots (optional)
Lime wedges (optional)
Crushed peanuts (optional)


How to make moo shu pancakes...


Combine flour, salt, and boiling water in a medium bowl, stirring with a heat-proof spoon (whisks get gummy, not recommended).  Add cold water, one tablespoon at a time, and stir until you have a slightly sticky dough (you may find you need less than 3 tablespoons for this).  Turn it out onto a floured surface and knead for 10 minutes until smooth (see figs. 1 and 2).  Cover and let rest for 30 minutes.


Divide your dough in half, roll each half into a ball and divide each into sixths (see fig. 3).  You should have 12 pieces (fig. 4).  Roll each piece into a ball.  Using a rolling pin on a lightly-floured surface, roll out each ball into a 2-inch disc (see background of fig. 5).  Stack discs in pairs, brushing some sesame oil and sprinkling a few chopped chives in between the 2 discs.  Roll out your disc "sandwiches" into 7 - 8 inch pancakes (foreground of fig. 5).  Heat a heavy skillet or griddle, brush lightly with sesame oil, and add pancakes one at a time.  Cook on both sides until blistered but not browned (fig. 6).  There will be several air pockets.  Set aside finished pancakes, covered to keep warm.


What to do for the filling...


In a wok or medium skillet, heat some sesame oil and add any uncooked vegetables and onions, adding those with longer cooking times first.  Cook until tender but still crisp.  Add your cooked shredded meat, any cooked veggies, plus ginger, garlic, soy/brown sugar, fish sauce and salt/pepper to taste.  Add your beaten egg and and toss/stir.  Heat until everything is heated thoroughly and egg is cooked (shouldn't be more than a couple minutes)


How to serve...


Combine all the ingredients for the chili/garlic sauce.  Serve along side the other accompaniments and pancakes.  Everyone can grab pancakes, add hot turkey filling, accompaniments, and a little sauce.  ENJOY!

Please vote for this recipe in the Foodista Best of Blogs Cookbook Contest!


Saturday, November 21, 2009

Brussels Sprouts w/Walnuts and Bacon: 3 Ingredient Recipe #10


3 Ingredient recipe: Brussels Sprouts with Walnuts and Bacon

I've read that a lot of the elaborate sauces invented by the French, and Roman sauces like garum , were concocted to mask the flavor of spoiled meats.  I thought about this as I worked thru the 10 days of this challenge.  Normally happy to be cooking with a spectrum of spices, I was now forced to focus on the details of my paltry ingredient lists... and while it's not like they were rotten or anything to begin with, they did have to be even better quality than the usual "it's gonna go so let's make stir fry out of it".

I'll admit this was intensely frustrating at first.  I found it amusing when friends would suggest dishes and it would be a conversation much like the process I'd go thru in my own head while putting these together: "Well you could just make a salsa and, wait, no that has 4 ingredients already... well I had this pesto cream with chicken and CRAP that's not going to work..."  You don't realized just how long the ingredient lists run in most recipes until you do something like this.

There are great things about it, though, obviously.  It's easy to go shopping for a recipe.  It has tendency to be less expensive.  It forces you to really think about each ingredient you choose.  

I think maybe my palate had been too spoiled before this.  We have so much flavor thrown at us in our food that  it can be easy to forget what the chicken tastes like outside the Kiev or the peppers before they've been stuffed.  This experiment, for me, has been like putting my taste buds on "time out" to think about just how much privilege they've had in their short lives, what with all the tandoories and tagines and tazikis available to them.  Except it turned out to be anything but a punishment.  The dishes were surprising flavorful and rich, much of that owing to the fact there was a sincere concentration, both in the cooking and in the dining process.

I really think I'll do this again sometime, and I hope you'll join me and at least watch the fun...

I thought I end this challenge with the recipe that put the idea in my head in first place: an impromptu side dish that turned into a meal.  All because Jason bought me these...


For a refresher on the rules of my 10 day, 3 ingredient challenge, check out the first post.

3 Ingredients...

  1. 1 pound of Brussels sprouts, quartered (or 1/2 the sprouts of one large stalk)
  2. 2 strips of bacon (diced)
  3. 2/3 cup walnuts (chopped and toasted in dry pan)


What to do with it...

  • Heat a large saute pan on medium heat and add your bacon, sautéing for 3 mins or until you have a some grease to cook your sprouts in
  • Add sprouts and cook for 15 mins, stirring occasionally - you want some of the sprouts to get a nice golden color and the bacon to cook (it won't get crunchy, though)
  • Add walnuts and salt and pepper

So easy, and so good!  Thanks so much to everyone who read along or contributed comments on this challenge, it's made all the difference!

Friday, November 20, 2009

Persimmon Cheesecakes: 3 Ingredient Recipe #9


3 Ingredient Recipe: Persimmon Cheesecake Cups

Ok, so I'm really excited about this one.  I wanted to do a dessert for one of the days in this challenge, but I just couldn't think of anything that didn't require lots of baking (too many ingredients) or was just fruit or gelatin or something (too easy).  One thing that makes it more difficult is that I am dessert-challenged.  While I can riff my way thru a 5 course meal without so much as glancing at a recipe, trying to make cookies without notes more often results in globby, burnt, or in some other manner inedible sweets than I'd care to admit.  No amount of pleading, threatening or tears seems to convince my ingredients to submit to my whims.

One especially memorable attempt was a batch of icebox lemon cookies that I deviated off the recipe for and ended up with more of a batter than a dough that when you placed them in the oven WOULD NOT BAKE.  They would just turn to runny, shapeless stubborn blobs and then, out of contempt for me, finally set themselves ablaze and left me with a tray of something resembling the s'mores that fall into the campfire.  I abandoned the notion of making cookies out of the remain raw paste, but since it really did have more the consistency of batter, I decided to show the goo I wasn't going down that easy and I made what I now call Cookie Dough Pancakes out of it.  They're actually quite a hit with Jason and he requests them from me all the time... so take THAT stupid jerk cookies...

Even if I manage to make a success out of my sweets experiments, however, they rarely turn out as they are originally intended.  Rather like children. So imagine my utter shock, my elation, as I removed perfect, gleaming little cheesecakes from the muffin tin.  A crossed-fingers bite confirmed it:  it was eatable.  It tasted like cheesecake.   It tasted like REALLY GOOD cheesecake!  And it had only three ingredients!  Shaking my tiny fists at the dessert gods who have for so long forsaken me, I was triumphant... and for any of my neighbors watching me from their windows from across the way, also a complete cackling lunatic.  But what did it matter?  I had perfect, airy, decadent persimmon cheesecake, and they could just watch me eat it...


For a refresher on the rules of my 10 day, 3 ingredient challenge, check out the first post.

3 Ingredients:
  1. 2 persimmons, hulled
  2. 1 8 oz package of cream cheese (softened)
  3. 1 14 ounce can of sweetened condensed milk

What to do with it...
  • Spray a standard 6-cup muffin tin with cooking spray or grease with butter
  • Puree one persimmon in a standard blender or with an immersion blender
  • With a hand mixer, whip together your cheese, persimmon puree, and 3/4 of your can of condensed milk until creamy/airy
  • Divide mixture into your muffin cups, cover with plastic wrap, and pop into the freezer for 30 mins (but not much more than that or they'll get too hard)
  • Slice your remaining persimmon into thin crescent wedges and dip in condensed milk to get a thin coat
  • Heat a little butter in a small nonstick skillet and place into the pan to "caramelize" for a moment
  • When your cheesecake cups are solid enough to remove, slide a butter knife dipped in hot water around the edges and pry each one out gently and plate
  • Arranged your persimmon wedges in a star shape on top of each cake
  • Finish them off by caramelizing persimmon tops further with a kitchen torch, or a quick moment under the broiler on high (test this on one as your broiler may not get hot enough and will just melt the cake)


NINE DOWN, JUST ONE TO GO!

Thursday, November 19, 2009

Duck Breakfast: 3 Ingredient Recipe #8


My favorite breakfast is a simple fried egg with hash browns.  I thought for this day in the challenge I'd make a breakfast, but in order to give it some richness, I decided to use duck eggs.  Having never fried a duck egg before, I wasn't sure what to expect - either from the cooking or the eating process. 

I've been reading up on the web about cooking and eating duck eggs by themselves and to some degree all the chatter made me apprehensive:  "Gamey" a couple of people said on Chowhound.  "The higher fat content makes it difficult to fry these properly and I recommend duck eggs for baking instead" came another comment. Not to be deterred from my culinary curiosity and pursuit for the best ingredients for the challenge, I researched the best/perfect way to fry my little treasures, and found that getting the eggs to room temperature so the whites and yolks cook more evenly.

To accompany the duck eggs, it only made sense to make the hash browns equally up to the duck standard.  I thought about the Belgian frite obsession (and I say understandably so) for duck fat and it became the obvious choice.  Of course, I understand not everyone can do duck fat for breakfast every weekend (I include myself in the group).  Substituting chicken fat or a combo of butter and oil works very well. I added a couple of other secrets to perfect hash browns in the recipe as well: rinse your potato shreds in cold water then drain very well, and don't salt them until they are plated.

The resulting product?  Creamy, rich eggs (no gamey-ness to be found) and crisp, flavorful hash browns.  Topped with the fried sage, they are heaven.


For a refresher on the rules of my 10 day, 3 ingredient challenge, check out the first post.

3 Ingredients...
  1. 2 duck eggs (let sit to room temp or placed in lukewarm water for 10 mins)
  2. 1 russet (or other starchy potato), shredded
  3. 5 sage leaves

What to do with it...

The hash browns...
  • Rinse your shredded potato in cold water and drain very well - I use a potato ricer to press out the most moisture possible (this step helps you get crispy, perfect hash browns) and pat dry
  • Heat some duck fat (or chicken fat or butter/oil) in a non-stick skillet on medium high heat
  • Add your shredded potato and shape to round pancake size
  • Fry on one side until golden, then remove from pan to plate and add a little more fat - make sure to keep the temp high, but not so high that fat is at smoking point
  • Invert your hash browns back into the pan to cook the raw side until golden
  • Remove to plate and add sea salt and cracked pepper
The eggs...
  • Melt a generous amout of duck fat or butter to the pan on medium high
  • When it begins to bubble, add eggs (you may want to crack into a separate bowl as the membranes on duck eggs tend to be thicker and require a little care)
  • Lower heat to medium and cook until the white is nearly done and there is just a little golden crispness to the edges
  • Remove from heat and cover - one minute for runny yolk, 2-3 for medium, 5 mins for well done
  • Add your egg to the top of the hash browns
The sage...
  • Brown some fat or butter in your pan on high and add sage leaves
  • Fry breifly on high until they start to crisp and turn golden then immediately pluck them out with tongs, one by one, and place on top of your eggs and hash browns
  • Season with a little salt and pepper 

Wednesday, November 18, 2009

Warm Orange Beet Salad: 3 Ingredient Recipe #7


Today Jason told me something I've never heard anyone say to me before: Eat your vegetables.  This has never been said to me because there has never been a need.  As a kid, I was always opting for something green over normal kid stuff.  I was the only grandchild on both sides of my family and therefore was never in short supply of sweets to test this theory, either.

The biggest contributor was my father's dad.  Growing up we lived in the same building my grandparents owned.  I would come down from the upstairs apartment and there would inevitably be something waiting for me on the landing of my grandparents' level: a candy necklace, something of the "gummy" variety, or these super-sugary juice drinks that came in red plastic bottles shaped like robots.  The last was my favorite because once the bottles were empty, I would set them up as bowling pins in the hallway and use my stuffed Popple as a bowling ball (does anybody remember those??).

Most of these sweets weren't as eagerly anticipated as the robots, though, and I'd eat maybe one or two pieces and the rest would go into "the candy drawer": the entire top drawer of my dresser which was routinely raided by my visiting friends but I could've cared less.  The real love for me was a good spinach pie, or cabbage and potatoes from a fresh corned beef roast and even a Greek dish called horta vrasta which is nothing more than boiled greens dressed in olive oil and lemon juice.... most kids wouldn't talk to you for a week if you served them what I begged for nightly.

So you see why I was so shocked to hear myself being scolded for the one thing I have always done willingly, but having been a very busy week, my veggie quotient has been shockingly paltry compared to usual.  So tonight I up the ante with this little beauty.  Inspired by those very same horta vrasta combined with a dish Jason's mother makes, it's a hearty salad that works as a whole meal (and did for me tonight!).  It uses the green tops of the beets which are really tasty and NOT poisonous as I know some people think.  They're in the same family as chards and the greens taste very similar to Swiss chard.  I mixed up the cooking methods from boiling to sautéing for added texture/flavor.  The result is a really nice, balanced and health salad that made a perfect meal!

...So go eat your vegetables before you get in trouble, too!

3 Ingredients...


1 bunch of beets with green tops
1 orange, juiced and zested
1/2 a yellow onion, sliced

What to do with it...

  • Remove greens from beets and wash everything thouroughly to remove grit and chop greens
  • Place beets into a medium pot and cover with water
  • Bring to gentle boil and cook until fork-tender (about 20 mins).  During this time you can cook the onions (see step 6)
  • When beets are cooked, drain and allow to cool just enough to handle and slip the skins from them
  • Slice the beets and set aside
  • Add onions to a skillet with some butter and cook on medium with a little salt for 10 minutes, watching that they don't burn
  • At end of 10 minutes, add orange juice to "deglaze" the pan and the remove orange/onion mixture to a medium bowl
  • In the skillet from the onions, add more butter and saute your beet greens with salt and pepper until wilted but still crisp (about 4- 5 mins) then add to your bowl with onion/orange mixture
  • Now saute your beets in the same way until they have a little golden crispness on each side (just 4 - 5 mins) and add to the bowl
  • Top with orange zest and more salt and pepper to taste


Seven down, 3 to go!

Tuesday, November 17, 2009

Tuna Steak with Spaghetti Squash Pancakes: 3 Ingredient Recipe #6


Well, I'm over the hump on the 10 day challenge and I find myself contemplating a spaghetti squash.  It's been sitting in my kitchen for a good week, waiting to be made into something tasty.  I halved and baked the squash and then contemplated one of the halves.  I had been thinking of baking and then deep-frying the ribbony flesh into crisp golden tendrils, so I heated up some oil and set to adding the shredded squash to fry.  The result was far from what I expected: The strings clung together in masses that looked like brambly, oil soaked nests.  FAIL.

Very glad I had another half, I started again, this time deciding to try just a quick pan saute in olive oil, but keep the essence of the squash in tact.  It wasn't as pretty, but I had a tasty blend of textures: vegetal and crisp.  It looked like a nice bed to serve under... something.  I had a plan for that, too: tuna steaks with a roasted garlic/peppercorn crust.  They turned out as luscious as filet mignon, but with a balanced lightness that married well with the squash.  I hope you try this, it's surprisingly good.


For a refresher on the rules of my 10 day, 3 ingredient challenge, check out the first post.

3 Ingredients...
  1. 2 tuna steaks
  2. 1 spaghetti squash - cut in half and seeded
  3. 8 cloves of garlic, roasted 
What to do with it all...
  • Preheat oven to 375 degrees
  • Place squash face up on middle rack of oven and roast for 45 mins or until fork tender - remove and allow to cool
  • Once cool enough to handle, begin using a fork to pull flesh out in ribbon-like "spaghetti"
  • Heat olive oil in a medium ovenproof saute pan on medium-high and add half of the squash "spaghetti"
  • Saute on medium-high for a couple of minutes, shaping like a pancake, then flip and repeat
  • Remove to a paper towel to drain and sprinkle w/salt and pepper
  • Repeat process w/second half of squash and set aside
  • Turn on your oven's broiler to high
  • Mash roasted garlic with a fork and add a tablespoon of roughly cracked peppercorns and sea salt to taste
  • Press the garlic/pepper paste to each of the tuna steaks on one side
  • Heat your ovenproof saute pan again on medium-high heat with more olive oil
  • Add steaks, naked side down and sear for a few moments, shaking to ensure it does not stick to bottom
  • Remove from stove and place under broiler for 2 - 4 mins depending on your broiler - you want the steaks to be just barely cooked on the outside, very pink in the middle
  • Place one squash pancake on each plate and slice tuna steaks into medallions and serve on top of pancakes


Six down, four to go!

Monday, November 16, 2009

Asian Potato Salad: 3 Ingredient Recipe #5


3 Ingredient Recipe: Scallion and Ginger Potato Salad

I love potato salad.  It's something I've made many times to bring to potlucks and I always found myself making the recipe more and more elaborate: ham and capers and artichokes.  Yes, they were tasty but at some point you can barely see the potatoes at all drowning under layers of smoked gouda and bacon.  


Here's a simple version of potato salad that uses both sauteed scallions and raw, bright citrusy ginger and nutty sesame oil.  I used a blend of Szechuan and black pepper corns, but just black pepper works nicely.


For a refresher on the rules of my 10 day, 3 ingredient challenge, check out the first post.


3 Ingredients....
  • 3 cups quartered red potatoes (or other waxy potato)
  • 1 bunch of scallions
  • 1 nob of ginger
What to do with it...

  1. Bring potatoes to a gentle boil and cook for approx. 20 mins, or until they can be pierced with a knife, but before skins start to loosen
  2. Drain and place into large bowl to cool
  3. While the potatoes cook, chop white & green portion of scallions finely, keeping separate
  4. Heat a small saute pan with enough sesame oil to coat generously and add white portion scallions
  5. Saute on medium-low until golden, about 11 mins
  6. Add sauteed scallions and raw green scallions to potatoes
  7. Grate in about a tablespoon of fresh ginger (a microplane grater works well for this)
  8. Add salt and pepper to taste and more sesame oil if desired


Just 5 more days left!

LinkWithin

Related Posts with Thumbnails